Section A: Writing your first Promise
This is Part 1 of a series illustrating how to write Kratix Promises.
👉🏾 Next: Using Promise Workflows
In this tutorial, you will
- Learn more about Promises
- Design an API for your service
- Define the dependencies of your promise
- Write a Workflow to deliver the service
- Experience requesting a Resource
What is a Promise?
In Part I, you learned that Kratix is a framework used by platform teams to build platforms tailored to their organisation.
Kratix Promises are the encapsulation of platform offerings. They provide a structure to manage the complexities of providing something-as-a-service, including the definition of how a user can request a Resource, the steps to provision the requested Resource, and how to provide access to the Resource.
Promises allow platform teams to:
- Define an API, including versioning and validation
- Execute imperative commands per the user request
- Use GitOps to continuously reconcile delivered services
- Install and configure (or verify) dependencies for delivering a service
- Manage where services are deployed across the infrastructure (on and off-Kubernetes, on Cloud providers, etc)
Promise Architecture
Before jumping into writing a Promise, here is a quick review of the Promise Architecture.
At a very high-level, a Promise is made up of four parts:
- The Promise API: The Promise API is what the users of the Platform will interact with when requesting a new Resource from the Promised Service
- The Imperative Workflow: A series of steps where Platform teams can codify all of their business requirements.
- The Declarative State: The Workflow executes a series of imperative steps to generate a declarative state that is then persisted to the State Store. Other systems will then converge on that state.
- The Dependencies: A dependency is anything that must be installed or made available on Destinations to enable the promised service to run.
As you go through building your own Promise, you will explore each of these four sections in detail.
The Promise
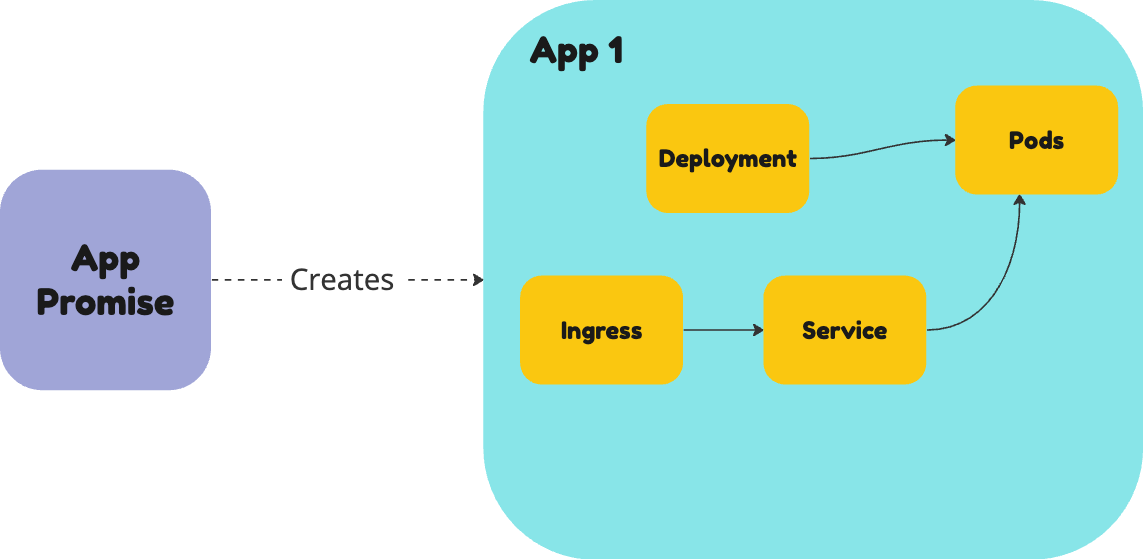
In this tutorial, you are going to create a Promise that delivers Apps as a service. It will bundle the Kubernetes resources needed to run an application, namely a Deployment, Service, and Ingress.
For Ingress, you will use the NGINX Ingress Controller. This is a popular Ingress Controller that is used to expose Kubernetes services to the internet.
You can start thinking about your promise by designing the Promise API.

Design an API for your service
When building an API, you have a lot of design considerations to include. For example, you will want to:
- require certain parameters
- make some parameters dependent on values in other parameters
- provide client-side validation
- run server-side validation
- ensure API versioning to manage updates
These and many other features are all provided as standard with a Kubernetes Custom Resource Definition (CRD). This is why Kratix uses CRDs as the mechanism to codify your Promise API.
In a Promise, the API is stored in a key called api
🤔 Want to learn more about CRDs?
A Custom Resource (CR) is an extension of the Kubernetes API that is not necessarily available in a default Kubernetes installation. It represents a customisation of a particular Kubernetes installation.
A Custom Resource Definition (CRD) is the object you create to teach your Kubernetes cluster about this new resource type.
To read more about CRDs please refer to the Kubernetes documentation.
This tutorial will not go through details on how to write a Kubernetes CRD, but you can check out the Kubernetes documentation for further details on the topic.
Start with the interface
A Kratix Promise allows platform teams to fine-tune how much application teams need to know about low-level details while still providing the levers they need to get the service they want.
You can start by defining an interface for the application teams to deploy their applications. This interface is the contract of what can be configured and within what parameters.
When designing the API for your new Promise, you can decide how much control you want to give to the application teams.
For example, you could allow them to configure all aspects of the underlying Deployment and Ingress rules. That option provides your users with maximum autonomy and configurability. However, it may be a lot to understand and misconfiguration of services can cause both cost and security issues in the future.
On the other hand, you could go to the other end of the spectrum, hiding all the options and asking users to provide only the absolutely necessary pieces of configuration. This allows for fewer configuration errors, but it also limits the flexibility of the service.
While both extremes are possible using Kratix, the recommendation is to design your API with one key principle in mind: what do your users (need to) care about? Answering that question is fundamental to designing a useful API.
Define your interface
At this stage, you decided to give users a very simple API. They can define:
- The container
imageof their app - The
service.portthe application is listening on
For the Ingress, you decided to hide it altogether and provide a default configuration.
As previously mentioned, the Kratix Promise API is defined via a Kubernetes CRD. A deep dive on CRDs is out of scope for this tutorial, but you can read more about them in the Kubernetes documentation.
To build the Promise, you can either write it yourself or bootstrap it with the Kratix CLI. In this workshop, you will use the CLI.
To keep the promise all in one place, create a directory called app-promise and run the init promise command inside it:
mkdir -p ~/app-promise && cd ~/app-promise
kratix init promise app --group workshop.kratix.io --version v1 --kind App
The command above should generate a promise.yaml file in the current directory. You can
check it out by running:
cat promise.yaml
Now, run the update api command to include the API fields you defined above:
kratix update api --property image:string --property service.port:integer
If you inspect the promise.yaml file again, you should see the API fields you defined
as a CRD:
cat promise.yaml | yq '.spec.api'
Click here to see the Promise so far
apiVersion: platform.kratix.io/v1alpha1
kind: Promise
metadata:
  name: app
spec:
  api:
    apiVersion: apiextensions.k8s.io/v1
    kind: CustomResourceDefinition
    metadata:
      name: apps.workshop.kratix.io
    spec:
      group: workshop.kratix.io
      names:
        kind: App
        plural: apps
        singular: apps
        shortNames:
          - app
      scope: Namespaced
      versions:
        - name: v1
          served: true
          storage: true
          schema:
            openAPIV3Schema:
              type: object
              properties:
                spec:
                  type: object
                  properties:
                    service:
                      type: object
                      properties:
                        port:
                          type: integer
                    image:
                      type: string
Great! Your Promise now has an API. You can move on to the next step: defining the dependencies.
Define the dependencies
The next step is to define the dependencies of your Promise. This is where you will define the Kubernetes resources that will be created when the Promise is deployed.
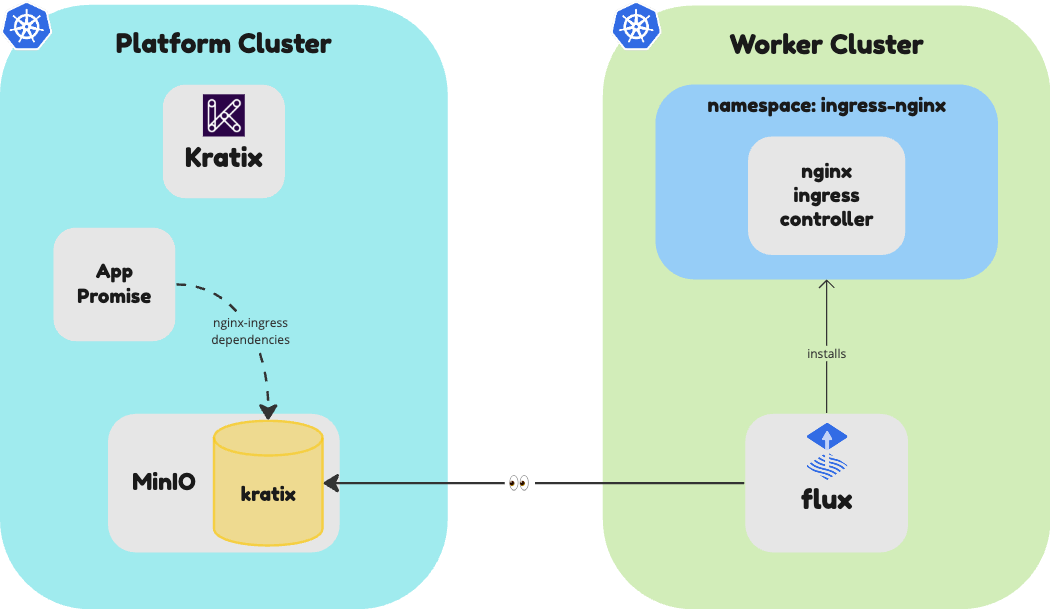
As previously mentioned, this Promise will create a Deployment, a Service, and an Ingress. Deployments and Services are built in to Kubernetes, so you can use them directly. However, to use the NGINX Ingress Controller, you need to have it installed on your worker cluster Destination prior to any user deploying their applications.
That's exactly what Kratix dependencies are for: to define the resources that need to be created when the Promise is installed.
If you follow the NGINX Ingress Controller installation instructions, you will find that you need the resources defined in this file installed on the cluster.
Create a subdirectory in your app-promise directory called dependencies. Then, create a file called dependencies.yaml and copy the contents of the file above into it.
mkdir -p dependencies
curl -o dependencies/dependencies.yaml --silent https://raw.githubusercontent.com/syntasso/kratix-docs/main/docs/workshop/part-ii/_partials/nginx-patched.yaml
Once stored locally, you can declare the Promise Dependencies in your Promise Workflow.
Declare Promise Dependencies in Promise Workflow
You can rely on the Kratix CLI to create the Promise Workflow for you.
Run the following command:
kratix update dependencies ./dependencies/ --image kratix-workshop/app-promise-pipeline:v0.1.0
At this stage, your directory structure should look like this:
📂 app-promise
├── README.md
├── dependencies
│   └── dependencies.yaml
├── example-resource.yaml
├── promise.yaml
└── workflows
    └── promise
        └── configure
            └── dependencies
                └── configure-deps
                    ├── Dockerfile
                    ├── resources
                    │   └── dependencies.yaml
                    └── scripts
                        └── pipeline.sh
The pipeline script generated by the CLI is already set up to deploy the dependencies into the Destinations. Check the pipeline.sh script for details.
Add the workflow to the Promise
The CLI already updated your Promise file with the Promise workflow.
Inspect it by running:
cat promise.yaml | yq '.spec.workflows'
Now, you'll need build the app-promise-pipeline image used in the configure-deps workflow and make it available in the container registry. Since you are
using kind clusters, you can build and load the image into the cluster directly by running the following commands:
docker build --tag kratix-workshop/app-promise-pipeline:v0.1.0 workflows/promise/configure/dependencies/configure-deps
kind load docker-image kratix-workshop/app-promise-pipeline:v0.1.0 --name platform
Amazing! You are now one step away from having a working Promise. The next step is to define the Resource Workflow, that is, what must happen when a user requests a new app deployment.
Define the Workflow
Kratix provides several hooks for managing and customising the Promise's lifecycle. Those hooks are defined in the Promise workflows key. The minimum you need to define is what must happen when the platform receives a request for a new resource from the promised service. Refer to the Workflows reference documentation for further details.
Kratix ships with a built-in Workflow kind, Pipeline, which provides a straightforward way to define Workflows. You could, however, use other tools (like Tekton) in your Workflows.
In a nutshell, a Kratix Pipeline is a series of containers that will be executed, in order. In this section, you will write and configure a Kratix Pipeline to be executed as part of the resource.configure Workflow.
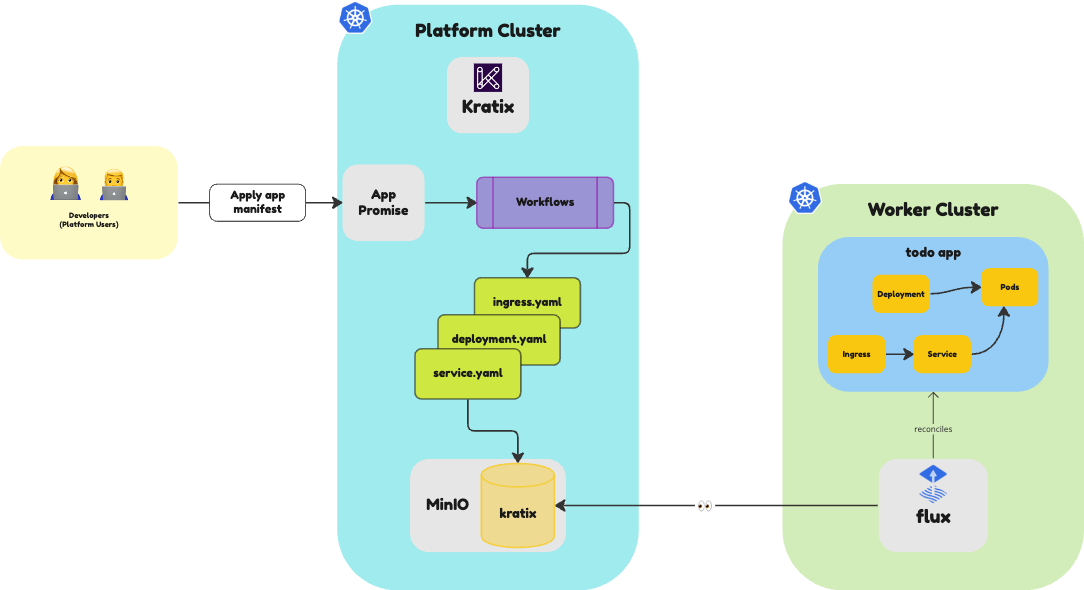
When a user requests a new App deployment, the resource.configure Workflow will be executed. This workflow will query the user's input and declare the resources that must be created.
We will once again use the Kratix CLI to create the necessary files. Run the following command to bootstrap the skeleton of your Workflow:
kratix add container resource/configure/mypipeline --image kratix-workshop/app-pipeline-image:v1.0.0
The command above should have created a directory structure that looks like the following:
.
├── README.md
├── dependencies
│   └── dependencies.yaml
├── example-resource.yaml
├── promise.yaml
└── workflows
    └── resource
        └── configure
            └── mypipeline
                └── kratix-workshop-app-pipeline-image
                    ├── Dockerfile
                    ├── resources
                    └── scripts
                        └── pipeline.sh
    ├── promise
    │   └── configure
    │       └── dependencies
    ...
The CLI will create a basic Dockerfile and a pipeline.sh script. We will customise these files to fit our needs as we progress through the workshop. Feel free to explore them.
The generated Dockerfile uses the alpine image as a base image. As you progress through the Workshop, you will install the tools you need to execute the steps. You may also notice that image will execute a script called pipeline.sh when the container starts.
As we will use this same image to build several stages in the pipeline, let's rename the pipeline.sh to resource-configure to better reflect its purpose.
mv workflows/resource/configure/mypipeline/kratix-workshop-app-pipeline-image/scripts/{pipeline.sh,resource-configure}
Make sure to update the Dockerfile to reflect the new script name. Replace the Dockerfile contents with the snippet below:
FROM "alpine"

RUN apk update && apk add --no-cache yq kubectl

COPY scripts/* /usr/local/bin/
ADD resources resources

RUN chmod +x /usr/local/bin/*

# Fix for when running workshop on Windows machine
RUN apk update && apk add --no-cache dos2unix
RUN dos2unix /usr/local/bin/*

ENTRYPOINT []
Replace the contents of the resource-configure script with the following:
#!/bin/sh

set -eux

# Get the user's input
image=$(yq '.spec.image' /kratix/input/object.yaml)
service_port=$(yq '.spec.service.port' /kratix/input/object.yaml)

# Get the request name and namespace
name=$(yq '.metadata.name' /kratix/input/object.yaml)
namespace=$(yq '.metadata.namespace' /kratix/input/object.yaml)

# Create a deployment
kubectl create deployment ${name} \
    --namespace=${namespace} \
    --replicas=1 \
    --image=${image} \
    --dry-run=client \
    --output yaml > /kratix/output/deployment.yaml

# Create a service
kubectl create service nodeport ${name} \
    --namespace=${namespace} \
    --tcp=${service_port}\
    --dry-run=client \
    --output yaml > /kratix/output/service.yaml

# Create an ingress
kubectl create ingress ${name} \
    --namespace=${namespace} \
    --class="nginx" \
    --rule="${name}.local.gd/*=${name}:${service_port}" \
    --dry-run=client \
    --output yaml > /kratix/output/ingress.yaml
As you can see, the script above uses the kubectl command to create a Deployment, a Service, and an Ingress. The script uses the yq cli to extract the user's input from the /kratix/input/object.yaml file. The object.yaml file contains the input the user provided when requesting the new resource.
You may also notice that the script uses the /kratix/output directory to store the resources that must be created. At the end of the workflow, Kratix will deploy the resources stored in the /kratix/output directory to one of the available Destinations.
Finally, you can see this pipeline script is written in shell script. Kratix is unopinionated about the language you use to write your Pipelines. You can use any language you want as long as you provide a script that can be executed in a container.
It's straightforward to test your pipeline using docker run (or equivalent). You will learn how to do that in a later stage.
When you ran the kratix add container command, the CLI automatically included the workflow key into the Promise, with the resource.configure Workflow defined. As you will add more scripts to the same image, open the promise.yaml and set the command key to the script you just created.
apiVersion: platform.kratix.io/v1alpha1
kind: Promise
metadata:
  name: app
spec:
  api: # ...
  dependencies: # ...
  workflows:
    resource:
      configure:
        - apiVersion: platform.kratix.io/v1alpha1
          kind: Pipeline
          metadata:
            name: mypipeline
          spec:
            containers:
              - name: kratix-workshop-app-pipeline-image
                image: kratix-workshop/app-pipeline-image:v1.0.0
                # *Add the line below*
                command: [ resource-configure ]

status: {}
The final step is to actually build the Resource Configure Workflow's pipeline image and make it available in the container registry. Similar to when you built the Promise Configure Workflow's Pipeline image, you can build and load the image into the cluster directly by running the following commands:
docker build --tag kratix-workshop/app-pipeline-image:v1.0.0 workflows/resource/configure/mypipeline/kratix-workshop-app-pipeline-image
kind load docker-image kratix-workshop/app-pipeline-image:v1.0.0 --name platform
And that's it! You have now defined a Promise that can be used to deploy a new App.
Click here for the full promise.yaml file.
promise.yaml file.apiVersion: platform.kratix.io/v1alpha1
kind: Promise
metadata:
creationTimestamp: null
name: app
spec:
api:
apiVersion: apiextensions.k8s.io/v1
kind: CustomResourceDefinition
metadata:
creationTimestamp: null
name: apps.workshop.kratix.io
spec:
group: workshop.kratix.io
names:
kind: App
plural: apps
singular: app
scope: Namespaced
versions:
- name: v1
schema:
openAPIV3Schema:
properties:
spec:
properties:
image:
type: string
service:
properties:
port:
type: integer
type: object
type: object
type: object
served: true
storage: true
status:
acceptedNames:
kind: ""
plural: ""
conditions: null
storedVersions: null
workflows:
promise:
configure:
- apiVersion: platform.kratix.io/v1alpha1
kind: Pipeline
metadata:
name: dependencies
spec:
containers:
- image: kratix-workshop/app-promise-pipeline:v0.1.0
name: configure-deps
resource:
configure:
- apiVersion: platform.kratix.io/v1alpha1
kind: Pipeline
metadata:
name: mypipeline
spec:
containers:
- name: kratix-workshop-app-pipeline-image
image: kratix-workshop/app-pipeline-image:v1.0.0
command: [ resource-configure ]
status: {}
Install the Promise
Go ahead and install the Promise in the platform:
kubectl --context $PLATFORM apply --filename promise.yaml
As part of the Promise configure Workflow, you have included the NGINX Ingress Controller. You can check that it got installed in the worker cluster Destination correctly by running the following command:
kubectl --context $WORKER get deployments --namespace ingress-nginx
It may take a couple of minutes, but you will eventually see an output similar to:
NAME                       READY   UP-TO-DATE   AVAILABLE   AGE
ingress-nginx-controller   1/1     1            1           2m8s
You can switch hats now and assume the role of an App developer trying to deploy their application.

Using the App Promise
As a developer, you can check the available promises by running the following command:
kubectl --context $PLATFORM get promises
The above command should output the following:
NAME   STATUS      KIND   API VERSION             VERSION
app    Available   App    workshop.kratix.io/v1
You can see that the app Promise is available. Great! You can deploy your app by providing an image and a service.port.
The CLI should've created an example-resource.yaml file in the app-promise directory. You can use this file to request a new App deployment. If the file is not there, you can create it by running the following command:
touch example-resource.yaml
Open the file in your editor and add the following content:
apiVersion: workshop.kratix.io/v1
kind: App
metadata:
  name: todo
  namespace: default
spec:
  image: syntasso/sample-todo:v0.1.0
  service:
    port: 8080
Then, submit the request by running the following command:
kubectl --context $PLATFORM apply --filename example-resource.yaml
Kratix will receive the request and execute the workflow defined in the Promise. You can verify the workflow by running the following command:
kubectl --context $PLATFORM get pods
The above command should output something similar to:
NAME                                       READY   STATUS      RESTARTS      AGE
kratix-app-todo-resource-configure-029c3-5tmbq     0/1     Completed   0             1m
It may take a few seconds for the pod to appear, but it will eventually show as Completed. At this stage, Kratix will schedule the workflow outputs to the worker cluster. You should see the App getting deployed on the Worker with the following command:
kubectl --context $WORKER get deployments
The above command should output something similar to (it may take a couple of minutes):
NAME   READY   UP-TO-DATE   AVAILABLE   AGE
todo   1/1     1            1           16s
Once the deployment is completed, you can access the App in your browser, at http://todo.local.gd:31338.

Bonus Challenge
Kubernetes CRDs provide many features that you can use to make your Promise API more user-friendly. For example, you can set the image property to be required, ensure service.port is within a range of ports and set it to be 8080 by default. Try adding some of those validations to your Promise API. Check the Kubernetes documentation for reference. Once you add the validations, try sending invalid resource requests and see how Kubernetes responds.
🎉 Congratulations!
You just now authored your first Promise and delivered an App-as-a-Service. Well done!
To recap what you achieved:
- ✅
api: Defined your Promise API as a Custom Resource Definition - ✅
dependencies: Defined a Promise configure Workflow so dependencies are present on your Destinations to fulfil this Promise - ✅
workflows: Built a simple pipeline step for Resource configuration - ✅ Installed your Kratix Promise
- ✅ Created and submitted a request for the promised Resource
👉🏾 Next, let's go over promise workflows.
