Creating the clusters
One of the most powerful Kratix features is the ability platform teams have to fully control the scheduling of work across extensive and diverse infrastructure, i.e. to determine in which Kubernetes cluster (or other infrastructure) a certain workload should be deployed to. Kratix leverages the GitOps toolkit to deliver this capability.
Kratix itself runs in Kubernetes. The first step in getting Kratix up and running is to create a Kubernetes cluster where you can install it. In this workshop, you will use kind to run Kubernetes clusters locally.
You can run the workshop without KinD. Ideally, you will have access to two Kubernetes clusters.
One cluster will be the Platform cluster, where Kratix will be installed.
Whenever you see --context $PLATFORM, replace it with the context of your
platform cluster.
The other worker will be the Worker cluster. Whenever you see --context $WORKER, replace it with the context of your worker cluster.
If you want to try it on a single cluster, you can omit the --context flag and
argument entirely.
Within the Kratix repository, you will find two KinD configuration files that will make it easier to interact with the clusters. Start by cloning the repository locally:
git clone https://github.com/syntasso/kratix
cd kratix
You can now create the Platform cluster with the following command:
# make sure there are no clusters running
kind delete clusters --all

kind create cluster \
    --name platform \
    --image kindest/node:v1.27.3 \
    --config config/samples/kind-platform-config.yaml
The Platform cluster is the Kubernetes cluster where Kratix will be installed. It will also be the cluster where the Platform team will manage the Kratix configuration.
Although it is possible to schedule workloads to the Platform cluster, it is not generally where most of the workloads will be deployed to. More often, platform teams will have a dedicated set of clusters (and other varied infrastructure) where the requested services will actually run. In this workshop, you will use a second cluster to simulate this scenario. Whenever you read Worker cluster in the workshop, it will refer to this second cluster.
Create the Worker cluster with the following command:
kind create cluster \
    --name worker \
    --image kindest/node:v1.27.3 \
    --config config/samples/kind-worker-config.yaml
To make it easier to interact with both clusters, set the PLATFORM and WORKER environment variables with each cluster context:
export PLATFORM="kind-platform"
export WORKER="kind-worker"
You can validate your clusters are running with the cluster-info command:
kubectl --context $PLATFORM cluster-info
kubectl --context $WORKER cluster-info
which should give an output similar to:
Kubernetes control plane is running at https://127.0.0.1:65003
CoreDNS is running at https://127.0.0.1:65003/api/v1/namespaces/kube-system/services/kube-dns:dns/proxy

Kubernetes control plane is running at https://127.0.0.1:65004
CoreDNS is running at https://127.0.0.1:65004/api/v1/namespaces/kube-system/services/kube-dns:dns/proxy
Install the Platform Prerequisites
Cert-manager
Kratix requires cert-manager to be installed in the cluster. Cert-manager is a Kubernetes add-on that automates the management and issuance of TLS certificates from various issuing sources.
To install it, run the following command:
kubectl --context $PLATFORM apply --filename https://github.com/cert-manager/cert-manager/releases/download/v1.15.0/cert-manager.yaml
You can validate cert-manager is running with the following command:
kubectl --context $PLATFORM get pods --namespace cert-manager
which should give an output similar to:
NAME                                      READY   STATUS    RESTARTS   AGE
cert-manager-7476c8fcf4-r8cnd             1/1     Running   0          19s
cert-manager-cainjector-bdd866bd4-7d8zp   1/1     Running   0          19s
cert-manager-webhook-5655dcfb4b-54r49     1/1     Running   0          19s
MinIO as the GitOps Repository
As mentioned before, Kratix leverages GitOps for deploying and reconciling scheduled workloads. That means that Kratix needs a backing service to serve as the state store. Kratix supports two types of state stores: S3-compatible buckets and Git repositories. In this workshop, you will use a MinIO instance running in the platform cluster as the state store. In productions environment, you will probably use a Git repository or a S3-compatible bucket in a cloud provider.
To install MinIO in the platform, run:
# from the root of the Kratix repository
kubectl --context $PLATFORM apply --filename config/samples/minio-install.yaml
The above command will:
- Deploy an instance of MinIO on the
kratix-platform-systemnamespace - Create a Secret with the MinIO credentials
- Run a Job to create a bucket called
kratixon the MinIO instance.
You can verify the installation by running:
kubectl --context $PLATFORM get deployments --namespace kratix-platform-system
The above command will give an output similar to:
NAME     READY   UP-TO-DATE   AVAILABLE   AGE
minio    1/1     1            1           1h
You can also verify the Create Bucket job:
kubectl --context $PLATFORM get jobs
The above command will give an output similar to:
NAME                  COMPLETIONS   DURATION   AGE
minio-create-bucket   1/1           3m5s       1h
Once the Job completes, you should be able to see the kratix bucket in the MinIO instance using the mc CLI:
# configure the mc CLI to use the MinIO instance
mc alias set kind http://localhost:31337 minioadmin minioadmin

# list the buckets
mc ls kind/
The above command will give an output similar to:
[2021-10-13 15:10:00 CEST] 0B kratix/
You platform cluster is now ready to receive Kratix!
Install the Worker prerequisites
Kratix schedules workloads to Destinations. For this workshop we will be using a Kubernetes cluster as our Destination by writing a state declaration (following the Kubernetes declare-and-converge pattern) to a designated State Store. When it comes to reconciling the declared state on the Destination cluster, Kratix remains agnostic about the specific tool to be used on the clusters. In this tutorial, you will utilise Flux on the Destination cluster, and configure it to reconcile the state from the MinIO bucket.
To install and configure Flux, run the following script from the Kratix repository:
./scripts/install-gitops --context $WORKER --path worker-cluster
The script above will:
- Install Flux
- Create a new Flux
BucketSource - Create two Flux
Kustomizations
The Flux Kustomizations are responsible for continuously reconciling with the state
declared in the Source.
If you are curious to know what this script does, or would prefer to configure the worker cluster yourself, take a look at the section below.
Configuring the cluster: the manual way
If you prefer to configure the worker cluster manually, follow the steps below.
Install Flux on the worker cluster:
kubectl --context $WORKER apply --filename https://github.com/fluxcd/flux2/releases/download/v2.4.0/install.yaml
Next, Flux must be configured to read from the MinIO bucket. For that, you will create a new Flux Bucket Source, together with a Secret containing the bucket credentials.
You may notice that the value of the Bucket endpoint on the document below is
set to 172.18.0.2:31337.
Flux now needs to access MinIO across clusters, so you will need to use an externally available endpoint.
172.18.0.2 will often be the address of the platform cluster running on KinD.
You can confirm this address with the following command:
docker inspect platform-control-plane | grep '"IPAddress": "172' | awk -F '"' '{print $4}'
The above command will give an output similar to:
172.18.0.2
If the command above outputs a different IP, make sure to update the Bucket configuration below accordingly.
The port part of the endpoint should always be 31337. Verify the NodePort of the MinIO service in the platform cluster:
kubectl --context $PLATFORM get services minio --namespace kratix-platform-system
The above command will give an output similar to:
NAME    TYPE       CLUSTER-IP    EXTERNAL-IP   PORT(S)        AGE
minio   NodePort   10.96.45.28   <none>        80:31337/TCP   1h
Create the Flux Source Bucket (and Secret):
cat <<EOF | kubectl --context $WORKER apply -f -
---
apiVersion: v1
kind: Secret
metadata:
  name: minio-credentials
  namespace: flux-system
type: Opaque
stringData:
  accesskey: minioadmin
  secretkey: minioadmin
---
apiVersion: source.toolkit.fluxcd.io/v1beta1
kind: Bucket
metadata:
  name: kratix
  namespace: flux-system
spec:
  interval: 10s
  provider: generic
  bucketName: kratix
  endpoint: 172.18.0.2:31337 # make sure to read the caution box above
  insecure: true
  secretRef:
    name: minio-credentials
EOF
The above command will give an output similar to:
secret/minio-credentials created
bucket.source.toolkit.fluxcd.io/kratix created
This tutorial will not dive into details of how to configure Flux Sources, but please read on their documentation if you are curious.
Once the Bucket Source is created, validate that Flux can reach the bucket:
kubectl --context $WORKER get buckets.source.toolkit.fluxcd.io --namespace flux-system
The above command will give an output similar to:
NAME            ENDPOINT           AGE     READY   STATUS
kratix   172.18.0.2:31337   1h      True    stored artifact: revision 'sha256:some-sha'
Next, you must tell Flux what to do with this Source. Flux does continuous
delivery through the Kustomize
Controller. You can define a Flux
Kustomization that watches for a Source and reconciles on events.
Create the Flux Kustomizations:
cat <<EOF | kubectl --context $WORKER apply --filename -
---
apiVersion: kustomize.toolkit.fluxcd.io/v1
kind: Kustomization
metadata:
  name: kratix-worker-dependencies
  namespace: flux-system
spec:
  interval: 8s
  prune: true
  sourceRef:
    kind: Bucket
    name: kratix
  path: ./worker-cluster/dependencies
---
apiVersion: kustomize.toolkit.fluxcd.io/v1
kind: Kustomization
metadata:
  name: kratix-worker-resources
  namespace: flux-system
spec:
  interval: 3s
  prune: true
  dependsOn:
  - name: kratix-worker-dependencies
  sourceRef:
    kind: Bucket
    name: kratix
  path: ./worker-cluster/resources
EOF
The above command will give an output similar to:
kustomization.kustomize.toolkit.fluxcd.io/kratix-worker-dependencies created
kustomization.kustomize.toolkit.fluxcd.io/kratix-worker-resources created
You will notice that there are two Kustomizations created. When scheduling workloads, Kratix will separate the documents based on their GVK (Group, Version, Kind):
- All dependencies (i.e. the Custom Resource Definition as defined
here)
will be written to a specific
dependenciespath within the State Store. - All other documents will be written to a specific
resourcespath within the State Store.
Later when you register the cluster as a Destination, Kratix will use the cluster's namespace
and name to build the full path for that cluster within the State Store.
The first Kustomization above is for dependencies (CRDs), while the second is for the other
resources (note the spec.path). You can also note that the
kratix-worker-resources depends on the kratix-worker-dependencies. That's to
avoid failures when a resource documents uses a GVK being defined by a CRD
document.
For further details on the naming convention for the buckets and paths, check the documentation. For more on Kustomizations, check the Flux docs page
Wait for Flux to start:
kubectl --context $WORKER get deployments --namespace flux-system --watch
The above command will give an output similar to:
NAME                      READY   UP-TO-DATE   AVAILABLE   AGE
helm-controller           1/1     1            1           10m
kustomize-controller      1/1     1            1           10m
notification-controller   1/1     1            1           10m
source-controller         1/1     1            1           10m
Once the Ready column reports 1/1, press Ctrl+C to
exit the watch mode.
At this stage, your environment looks like this:
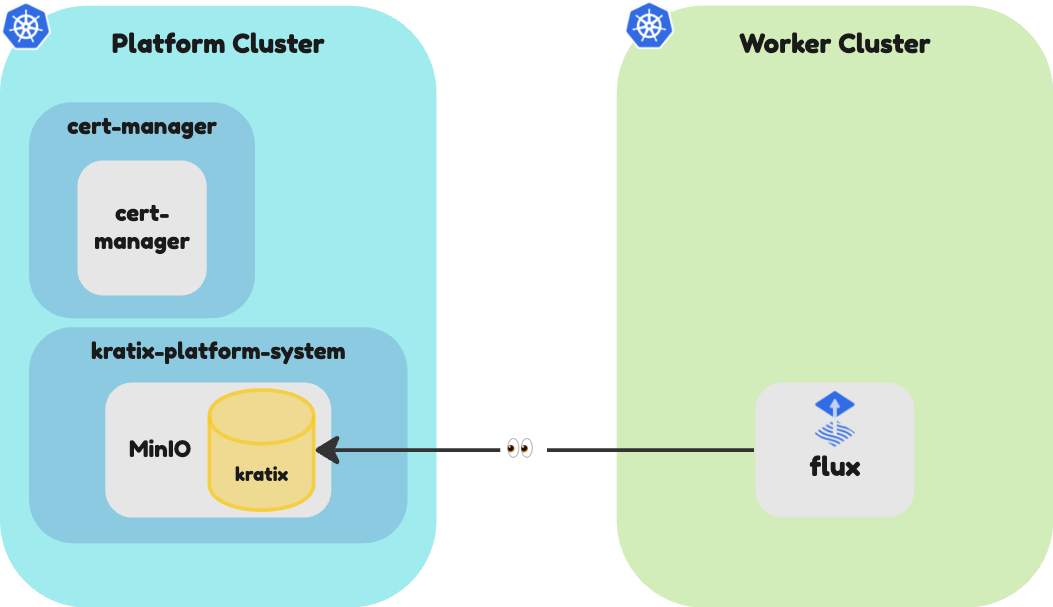
You are now ready to move to Part I and install Kratix!
