Using the SKE Cortex Integration
With your Cortex Workspace configured and the Cortex Controller installed on your Platform Cluster, you will now be able to leverage the SKE Cortex integration. If you have not setup the workspace and installed the controller, follow the Configuring Cortex guide.
How does it work?
The SKE Cortex Controller uses the the Cortex API to generate Entity Types and Workflows in Cortex, these can be used to manage the lifecycle of Resource Requests in the SKE Platform.
Global Entities
Two global Cortex resources are created once when the SKE Cortex Controller starts:
kratix-promiseEntity Type: the shared entity type used by all Promise entities.instance-of-promiseRelationship Type: the relationship type that links each Resource Request entity back to its parent Promise entity.
These global resources are only created or updated when the controller starts. If either is manually deleted from Cortex, the controller will not recreate them automatically. A controller restart is required to restore them.
To restart the controller:
kubectl rollout restart deployment/ske-cortex-controller -n kratix-platform-system
Per-Promise Entities
For each labelled Promise, the SKE Cortex Controller will create and keep in sync the following objects in Cortex:
Promise Entity Type: represents the resource being Promised in Cortex, derived from the Promise API.
Promise Entity: one entity of type kratix-promise is created to represent the Promise itself. This entity is created and kept in sync during normal Promise reconciliation, so if it is deleted from Cortex it will be recreated the next time the Promise is reconciled.
Resource Request Entities: one entity is created per Resource Request, typed after the Promise (e.g. redis). Each resource entity is linked to its parent Promise entity via the instance-of-promise relationship type, enabling navigation from a resource back to the Promise it was created from in the Cortex UI. Resource Request entities also record the email address of the user who triggered the Workflow as the entity owner, so platform teams can see who last created or updated a given resource.
Create, Update and Delete Workflows: three workflows are generated to manage the lifecycle of Resource Requests. When a user uses the Create Workflow to make a Request, the Workflow generates a YAML document for that request and writes it to the Cortex Git Repository. When the Platform Cluster converges on this and creates the Resource Request, the Cortex Controller creates the corresponding Resource Request Entity in Cortex.
All per-Promise entities are tagged with the kratix-resources group, which allows all Kratix-managed objects (Promises and resource requests alike) to be surfaced together under a single catalogue item in Cortex.
When a given Resource Request or Promise is deleted (either via the Workflow or the Kubernetes API), the corresponding objects in Cortex will also be deleted.
Generating the Workflows
The Cortex Controller takes the API of the Promise and uses this to create the fields for the generated Entity Type in Cortex.
Cortex supports the following API types: boolean, number, object, string, as well as arrays of each of these types. Object arrays can only have a single level of nesting. Outside of an array, objects cannot exceed more than five levels of nesting. Promise schema constructs that include properties outside this set cannot be expressed as Workflow inputs, and when the controller encounters one, the Create, Update, and Delete Workflows in Cortex will not be generated.
Optional fields in Resource Requests
When a user leaves an optional field blank in a Cortex form, the generated Resource Request omits that field. Optional nested objects are also omitted when all of their fields are blank. This prevents blank values from failing validation against the Promise API.
Required fields and boolean fields are always included. Valid values such as false for a boolean or 0 for a number are preserved. Empty arrays are included as [].
When a Cortex Workflow input is typed as string and a user enters a value that consists only of digits, make sure to wrap purely numeric values in quotes (for example, "0001234") when filling the Cortex form so the value is interpreted as a string.
Labelling Promises for Cortex Integration
To take advantage of the Cortex Integration for a given Promise and automatically generate Cortex objects, label your Promise with kratix.io/cortex: "true".
kubectl label promises PROMISE_NAME kratix.io/cortex=true
Or add the label to the Promise spec:
apiVersion: platform.kratix.io/v1alpha1
kind: Promise
metadata:
  name: my-promise
  labels:
    kratix.io/cortex: "true"
The Cortex Controller will then create the Cortex objects which you will be able to see in the Cortex UI.
Skipping Workflow Generation
By default, the Cortex Controller generates Create, Update, and Delete workflows for every managed Promise.
If you want to skip generation of specific workflows, annotate the Promise with kratix.io/cortex-skip-workflows
set to a comma-separated list of operations to skip. Valid values are create, update, and delete.
For example, to skip the Update and the Delete workflows:
apiVersion: platform.kratix.io/v1alpha1
kind: Promise
metadata:
  name: my-promise
  labels:
    kratix.io/cortex: "true"
  annotations:
    # comma-separated list of workflows to skip
    kratix.io/cortex-skip-workflows: "update,delete"
When workflows are skipped, the controller deletes any previously created Cortex workflows for those operations. If the annotation contains an invalid value, the controller falls back to generating all workflows.
Customising Name and Namespace Fields
By default, the generated Create and Update workflows include two mandatory fields Name and Namespace. These fields may not be meaningful to all platform users. You can customise the display name and description of these fields by setting annotations on the Promise.
Supported annotations:
| Annotation | Default | Description |
|---|---|---|
kratix.io/cortex-name-field-name | Name | Display name for the name input field |
kratix.io/cortex-name-field-description | Resource name | Help text shown below the name input field |
kratix.io/cortex-namespace-field-name | Namespace | Display name for the namespace input field |
kratix.io/cortex-namespace-field-description | Resource request namespace | Help text shown below the namespace input field |
kratix.io/cortex-fixed-namespace | unset | Fixed metadata.namespace value for generated Resource Requests |
For example, to customise the displayed name for the name field as "Service ID" and the namespace field as "Team":
apiVersion: platform.kratix.io/v1alpha1
kind: Promise
metadata:
  name: my-promise
  labels:
    kratix.io/cortex: "true"
  annotations:
    kratix.io/cortex-name-field-name: "Service ID"
    kratix.io/cortex-name-field-description: "A unique identifier for your service"
    kratix.io/cortex-namespace-field-name: "Team"
    kratix.io/cortex-namespace-field-description: "The team that owns this service"
Each annotation is optional. If an annotation is missing or empty, the default value is used. This means you can customise only the fields you need.
The field name and description annotations only affect how fields are displayed in the Cortex workflow UI. The generated
Kubernetes manifest always uses metadata.name and metadata.namespace, so the manifest is valid and can be applied
for Kubernetes.
Using a Fixed Namespace
If all Resource Requests for a Promise should be created in the same namespace, set
kratix.io/cortex-fixed-namespace on the Promise. The generated Cortex workflows will not ask users for a namespace,
and generated Resource Requests will use the annotation value as metadata.namespace.
apiVersion: platform.kratix.io/v1alpha1
kind: Promise
metadata:
  name: my-promise
  labels:
    kratix.io/cortex: "true"
  annotations:
    kratix.io/cortex-fixed-namespace: "my-namespace"
Use this when the Promise has a fixed namespace for all requests and the namespace is not a useful concept for the Cortex users creating those requests.
Managing Resource Requests in Cortex
When a Promise has been successfully installed with the Cortex integration, Platform users can use Cortex workflows to manage the lifecycle of their services. From either the Entity Type view or the Workflows view, users can trigger the Create Workflow for the desired Entity Type that represents the Promise. When initiating the Workflow, they will be presented with the input form with fields that honour the Promise API.
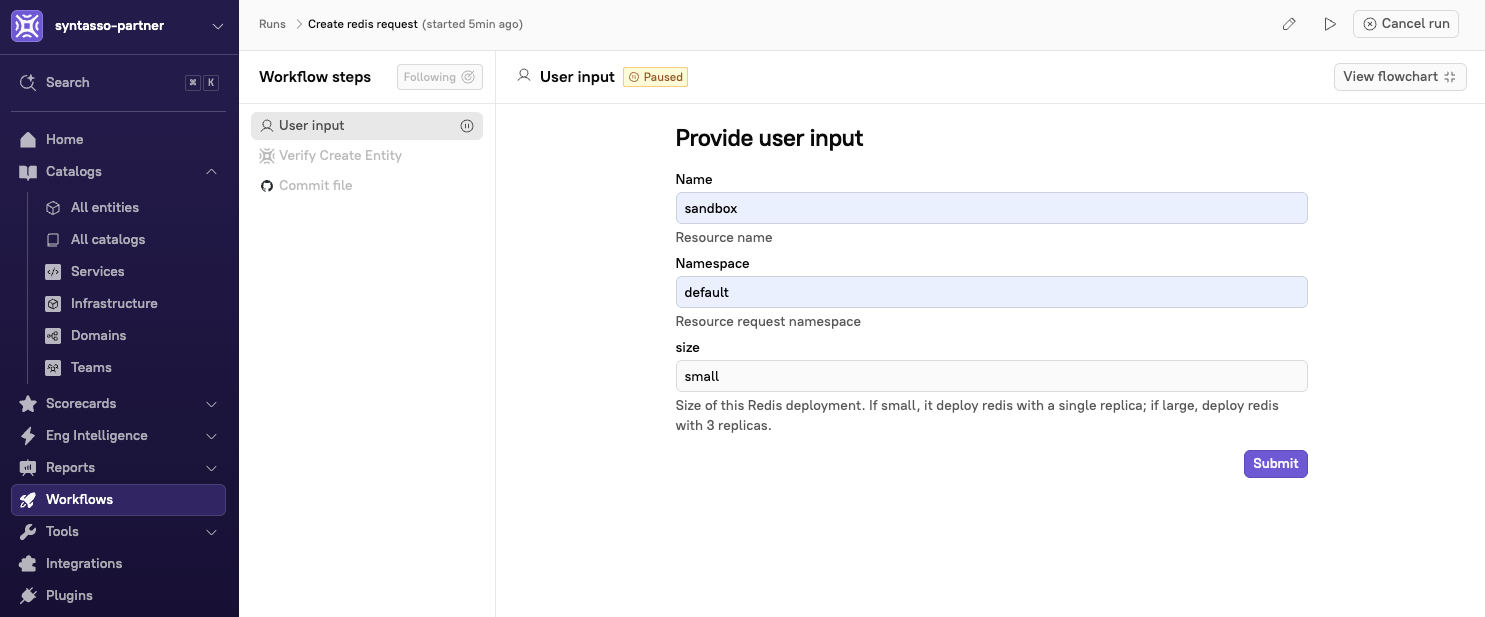
Upon submitting their request form, the Resource Request will be written to the configured Git Repository and created on the Platform Cluster. The creation of the request on the cluster will trigger a Kratix Workflow that creates an Entity representing the Resource Request in Cortex.
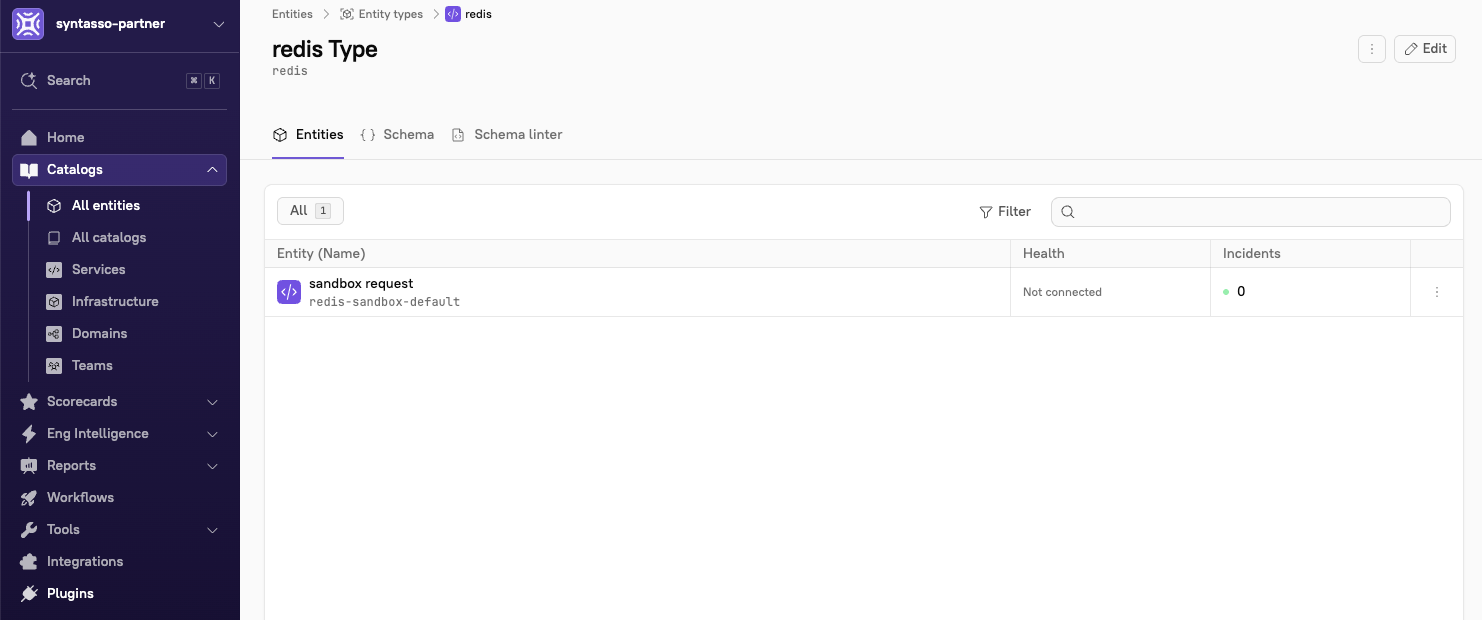
The Resource Request can then be managed via the Entity in Cortex, which will expose both the Update and Delete workflows for the Entity.

Running the Update Workflow for the Resource Request will update the request in the Git Repository and eventually, the Kratix workflows for the request will re-run and the Entity in Cortex will be updated accordingly.
Triggering the Delete Workflow will remove the request from the Git Repository, trigger a deletion on the Platform Cluster and remove the Entity from Cortex.
