Scheduling to different Terraform Workspaces
SKE comes with a series of integrations, including one with Terraform Enterprise. With the integration, your Promises can schedule workloads to be run on HCP Terraform or Terraform Enterprise.
A common question when using SKE with Terraform is how to create Promises that schedule requests to be executed on different Terraform workspaces.
For example, suppose there are multiple teams in your organisation: a frontend
team, a mobile team, and a backend team. You want to isolate the workspaces in
your Terraform Enterprise, in such a way that members of a team only have access
the workspace for their team. For example, the mobile team has access to a
mobile-team-workspace.
This guide will show you how you can use Dynamic Scheduling within your Pipeline stages to achieve this outcome. You will:
- Learn how to use Destination Labels to control where requests go
- Learn how to configure your Terraform workspaces to match your Destinations split
- Learn how to use Destination Selectors for dynamic scheduling
Pre-requisites
This guide will walk you through how to configure the Platform and the Destinations to work with an example Promise. You can just read through it.
To install and execute the example Promise in your environment, you will need:
- An AWS account for Terraform Cloud to use for infrastructure provisioning
- A Terraform workspace configured to watch a Git repository. As we'll also be creating an AWS resource, this workspace should have AWS credentials configured.
- An installation of SKE. Go to Configuring SKE and follow the appropriate guide if you haven't done so already.
An Overview of the Platform
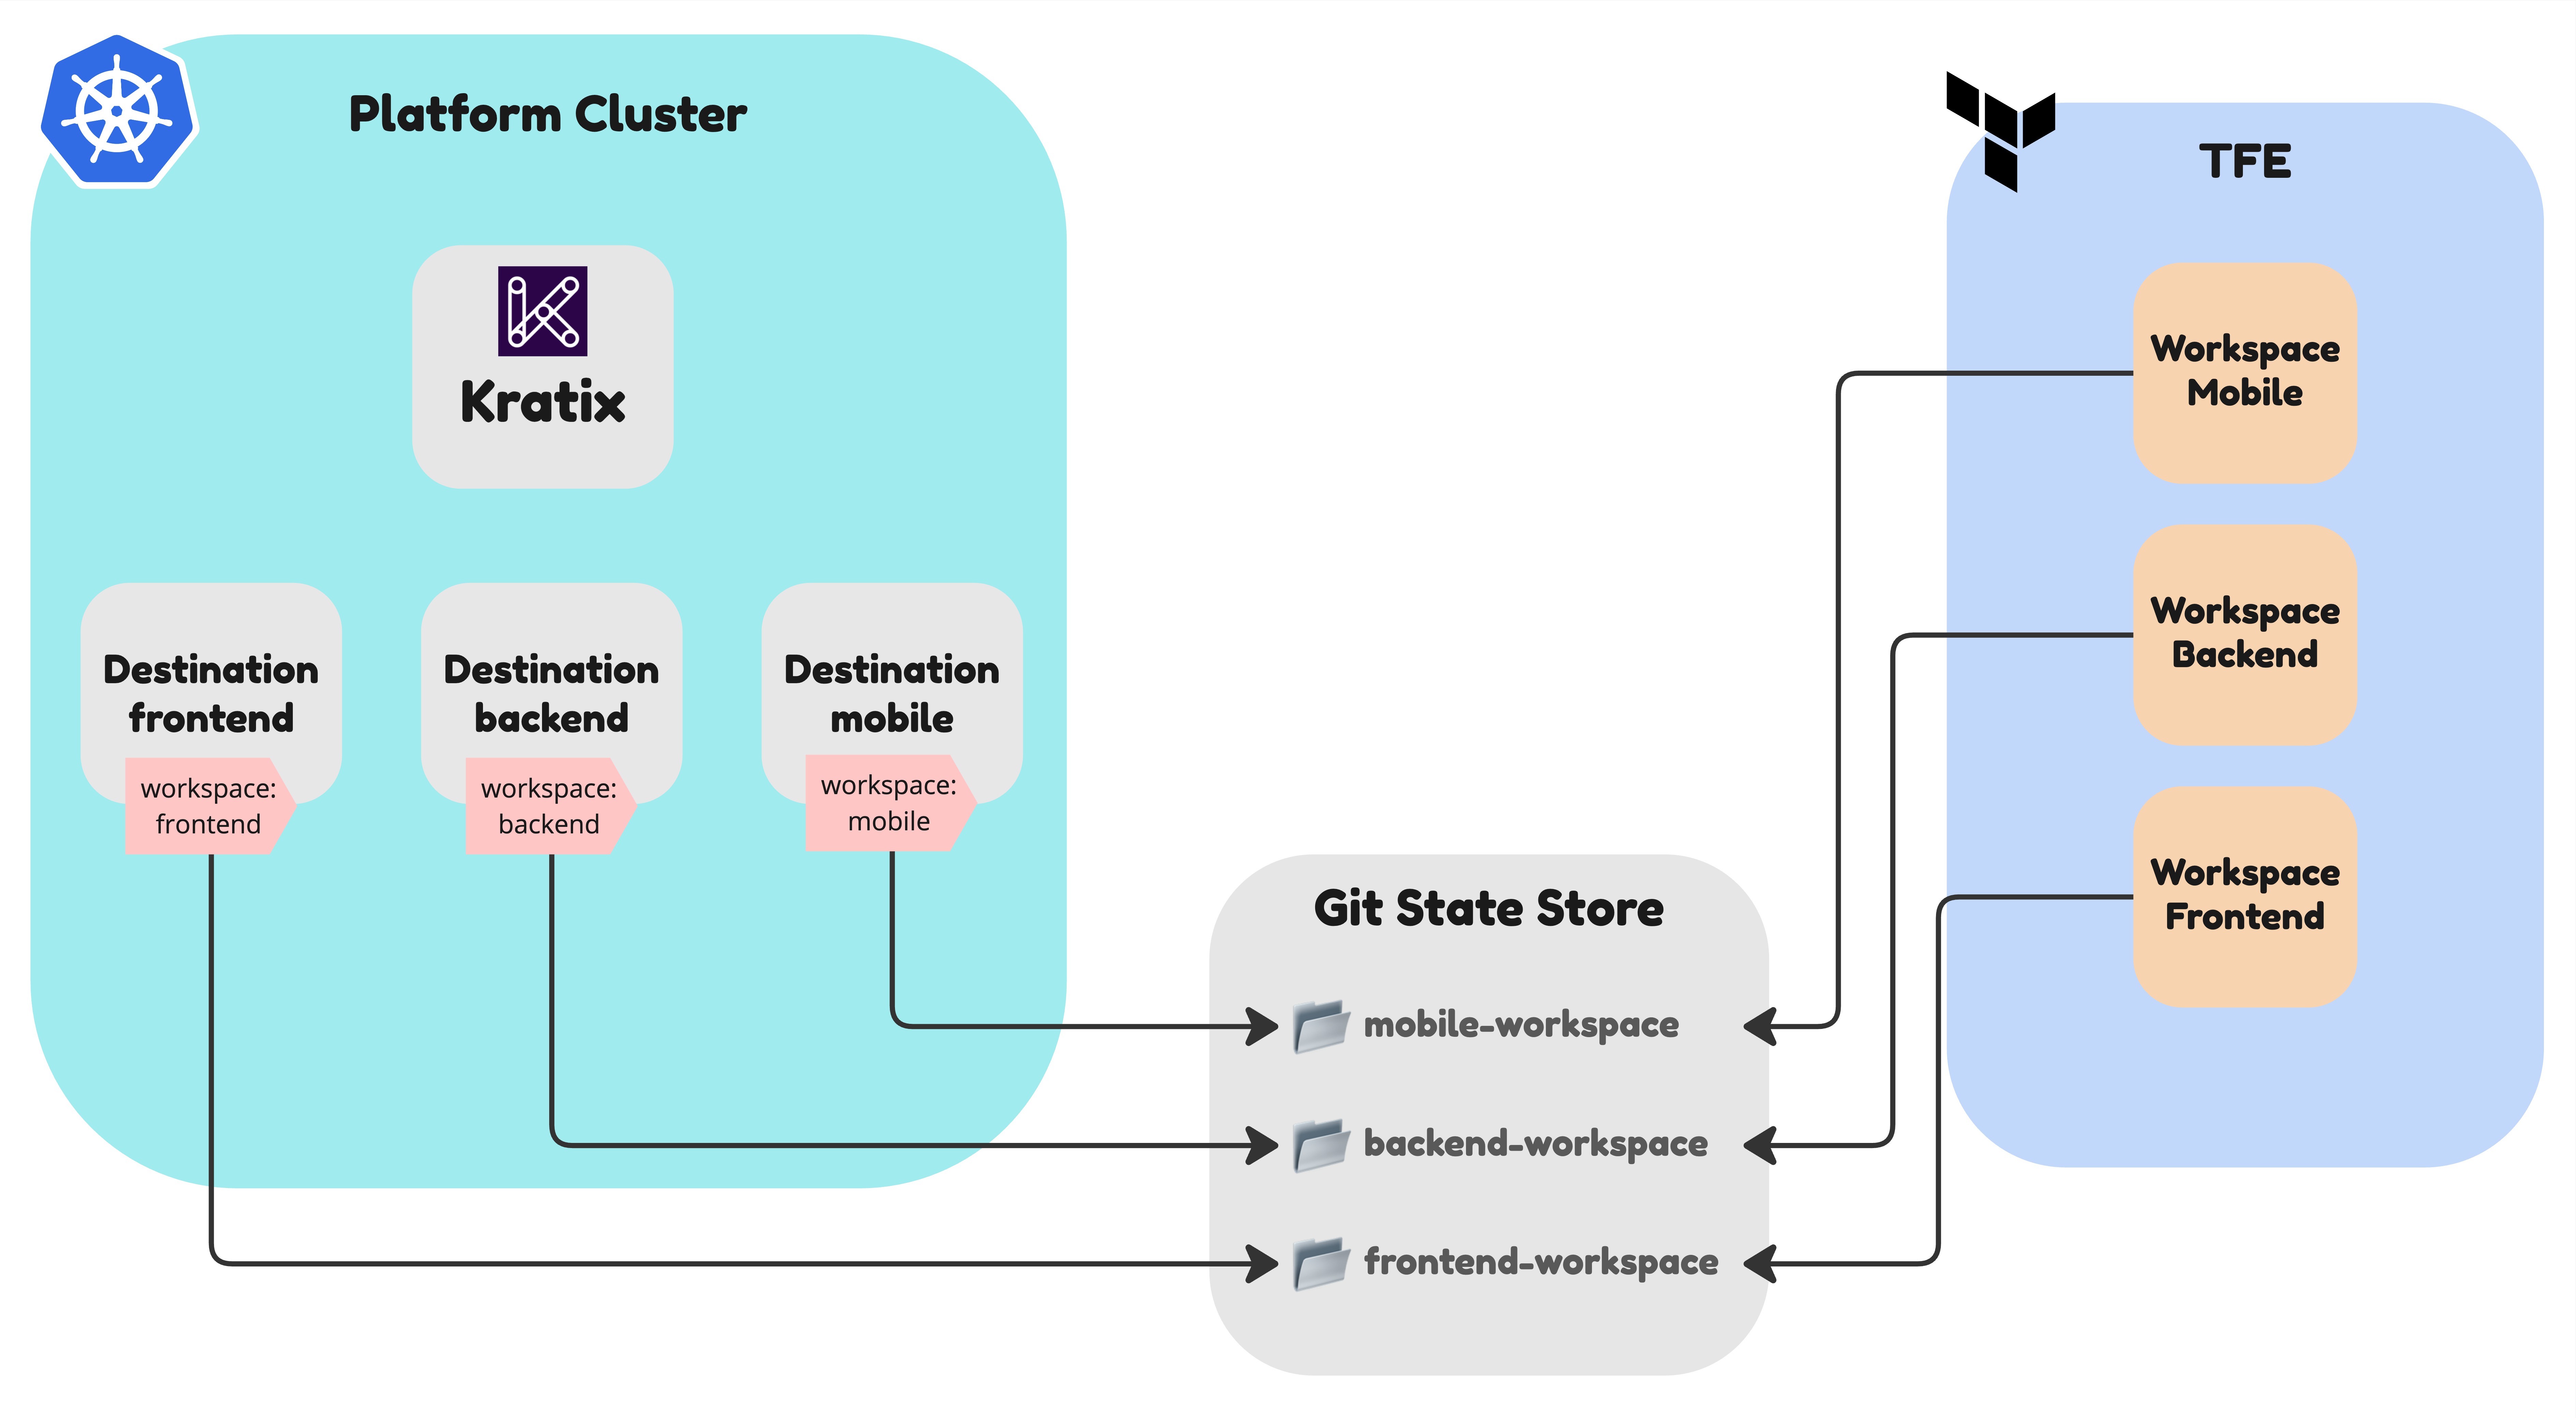
Before we dive into configuring your Platform and installing and using the Promise, let's take a high-level view of what your Platform will look like, what will the Promise output, and how SKE will process the request:
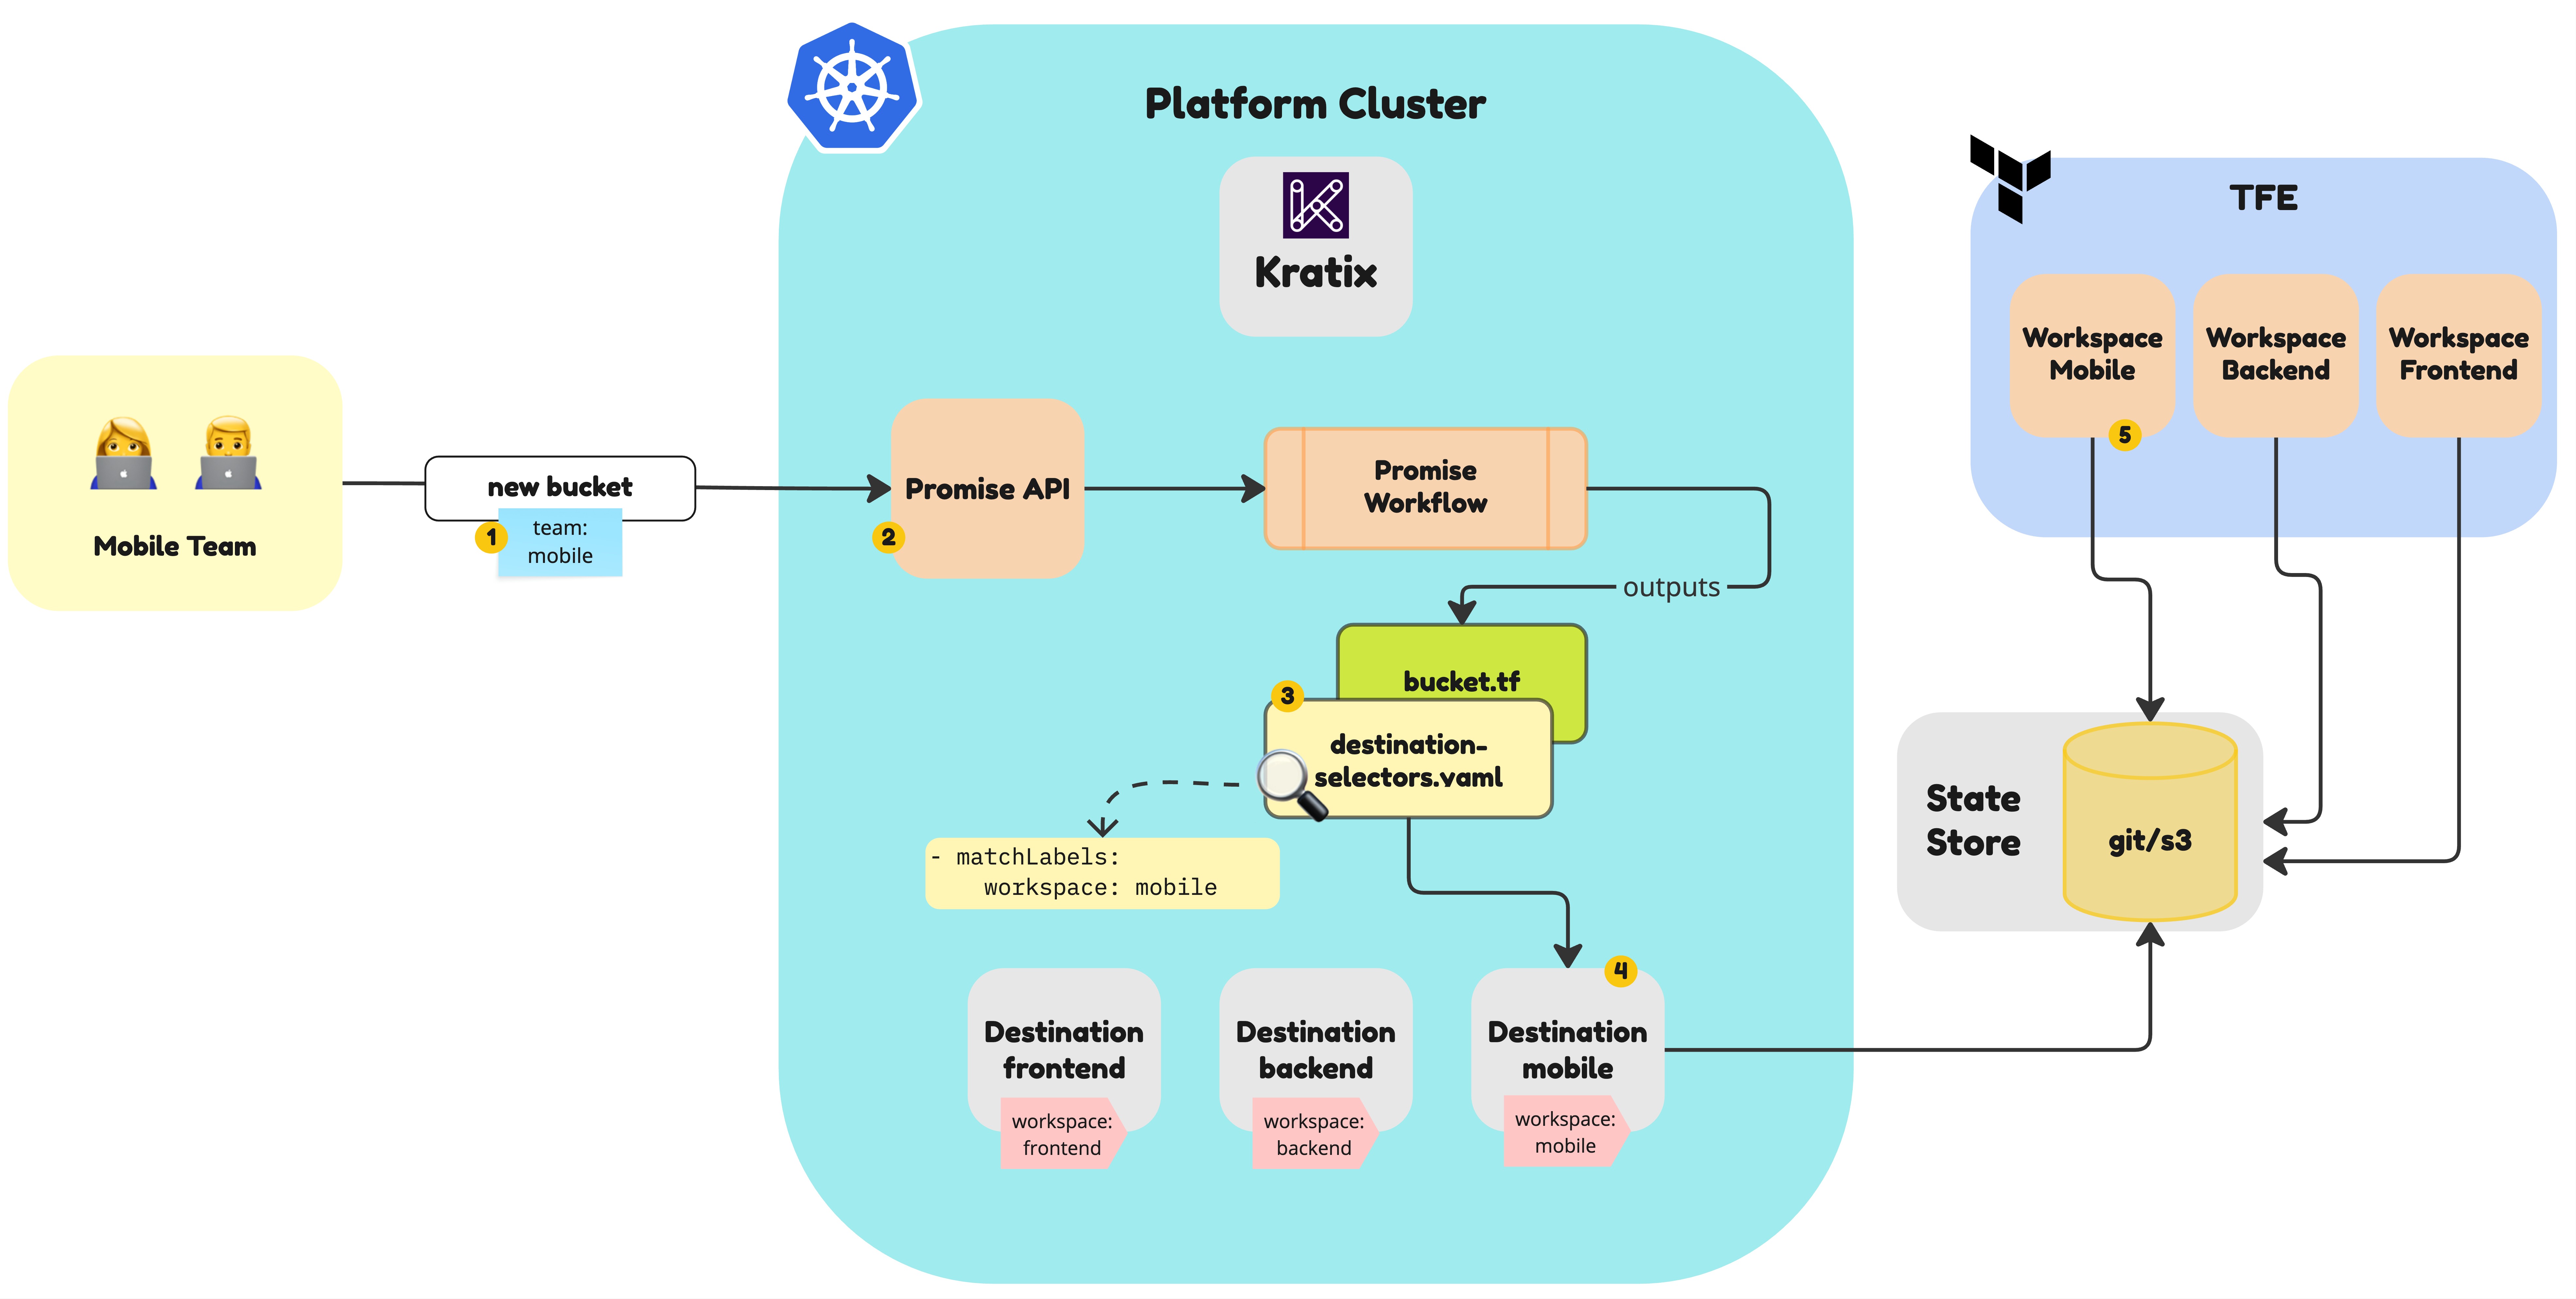
On the bottom, you can see the Destinations currently configured in the Platform. In this example, we have three Destinations:
- A
frontendDestination for the frontend team - A
backendDestination for the backend team - A
platformDestination for the platform team
On the right, you can see Terraform Enterprise. In it, we configured a Workspace for each team. Each workspace is configured to watch a directory in a Git Repository. SKE will write the Terraform files to the right subdirectorty in the State Store depending on the Destination, and Terraform Enterprise will apply the changes to the workspace.
The example Promise in this guide provides S3 buckets as a service. Let's go through what happens when a member of the Mobile team requests a new S3 bucket:
- The request for a new bucket is sent to the Platform. It includes the team membership information.
- It hits the Platform via the Promise API, which will trigger the Promise workflow.
- The Promise workflow is executed and outputs a series of Terraform files that will be used by Terraform Enterprise to create the bucket. It also include a special Kratix metadata file, the destination selectors, that will be used by SKE to send the request to the correct Destination.
- In this example, the Destination Selectors file will instruct SKE to send the
request to the Destination with the label
workspace: mobile. The terraform files will be written to the the subdirectory in the State Store for the mobile team. - Terraform Enterprise is configured to watch the State Store for the mobile team. It will apply the changes to the workspace and create the bucket.
With that in mind, let's go through the details of how you can configure your Platform to achieve this result.
Configuring your Destinations
If you are not familiar with the concept of Destinations, you can read more about them in the Destinations Reference docs or by trying out the Kratix Workshop.
The first step is to configure your Destinations to match the different Workspaces you want to have in your Terraform Enterprise. Each Destination must have an unique label, so SKE can identify the correct Destination to send the request to when a request comes in.
The Destination mapping to the Mobile team workspace in TFE could look like this:
apiVersion: platform.kratix.io/v1alpha1
kind: Destination
metadata:
  name: mobile
  labels:
    workspace: mobile
spec:
  path: mobile-workspace
  filepath:
    mode: none
  stateStoreRef:
    name: gitops-state-store
    kind: GitStateStore
With all Destinations configured, you should see the following when listing the Destinations:
$ kubectl get destinations --show-labels
NAME       READY   LABELS
mobile     True    workspace=mobile
backend    True    workspace=backend
frontend   True    workspace=frontend
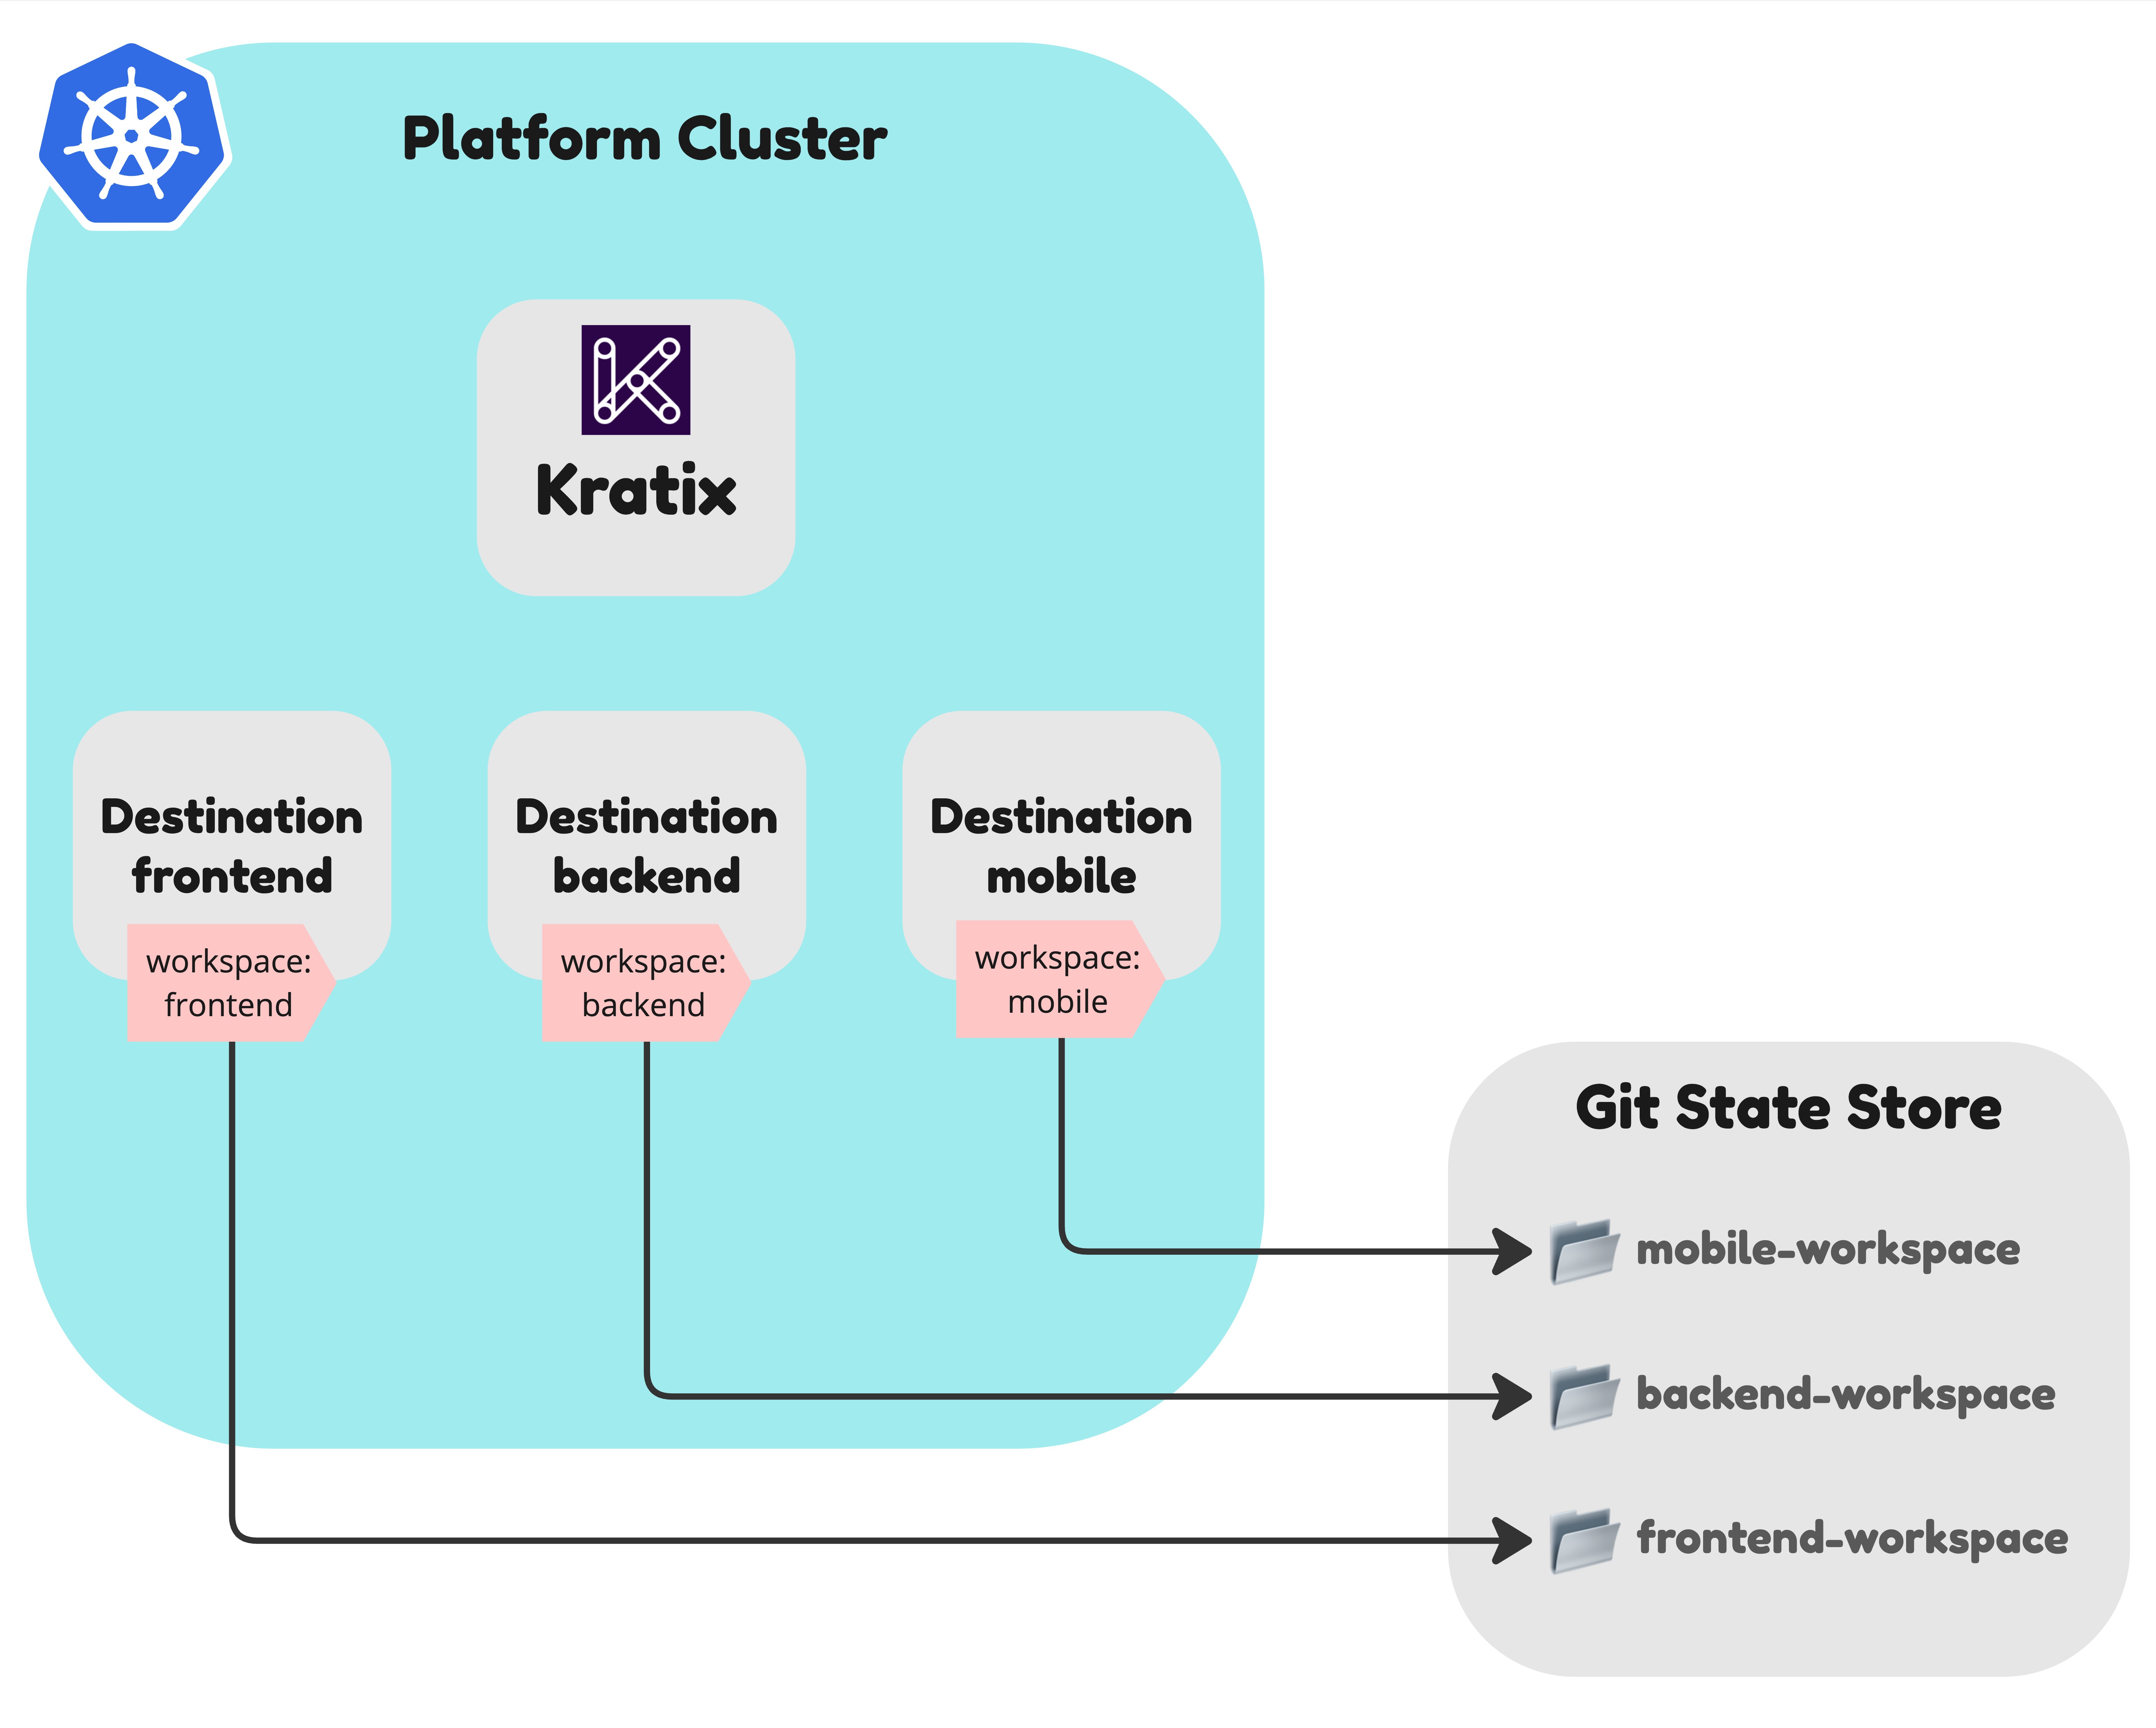
The State Store referenced by the Destination above is a Git repository that will be written to by SKE and read from by Terraform Enterprise. Configuring it is outside the scope of this guide, but you can read more about it in the State Store Reference docs.
At this point, your Platform should look like the diagram below:
Configuring Terraform Enterprise
Next, let's configure Terraform Enterprise to watch for changes in the State Store. In this example, we will be using Terraform Cloud, but the same principles apply to Terraform Enterprise.
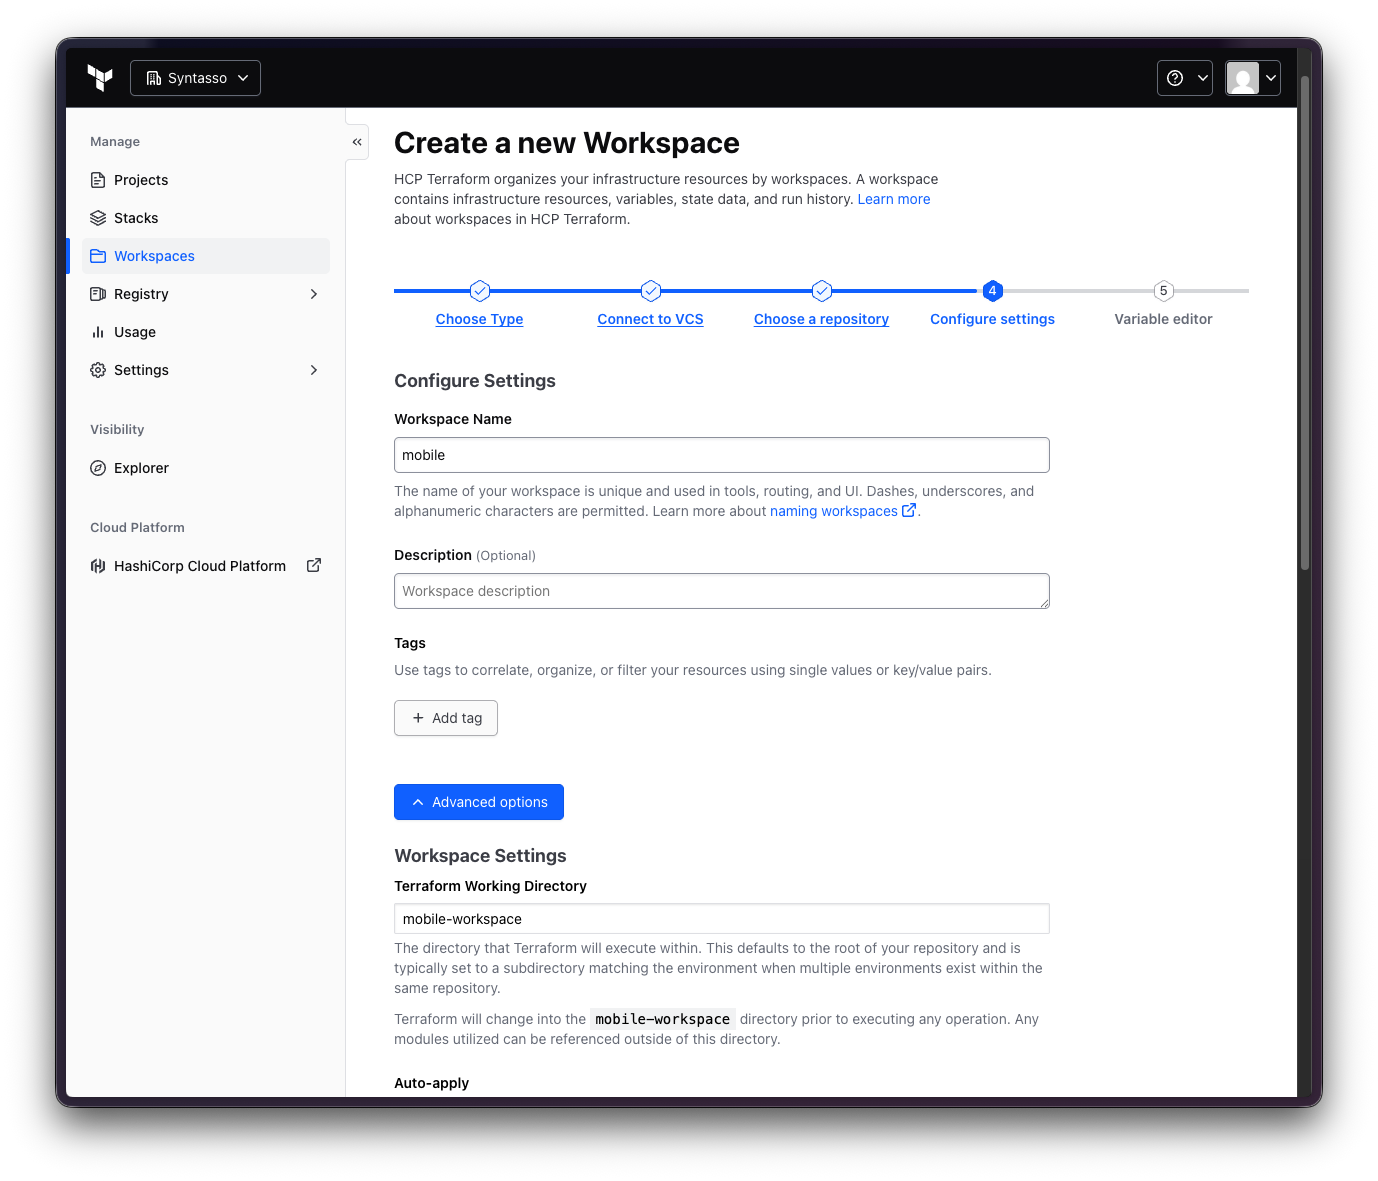
First, go to the Terraform Cloud dashboard, select your Project and click on the "Workspaces" tab. Then click on the "New" to create a new Workspace.
For complete instructions on how to configure Terraform Cloud, please refer to the Terraform Cloud documentation.
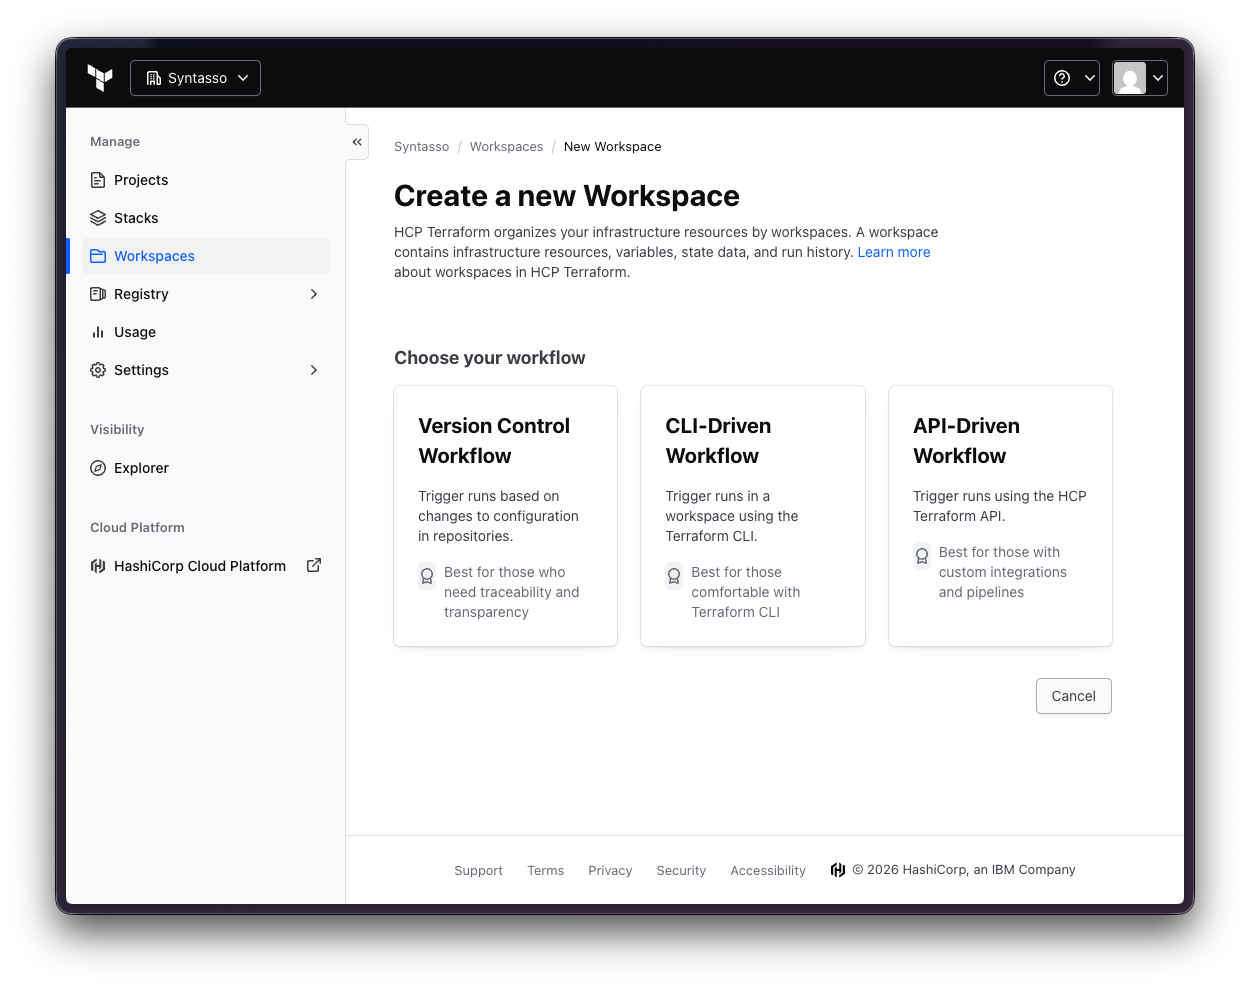
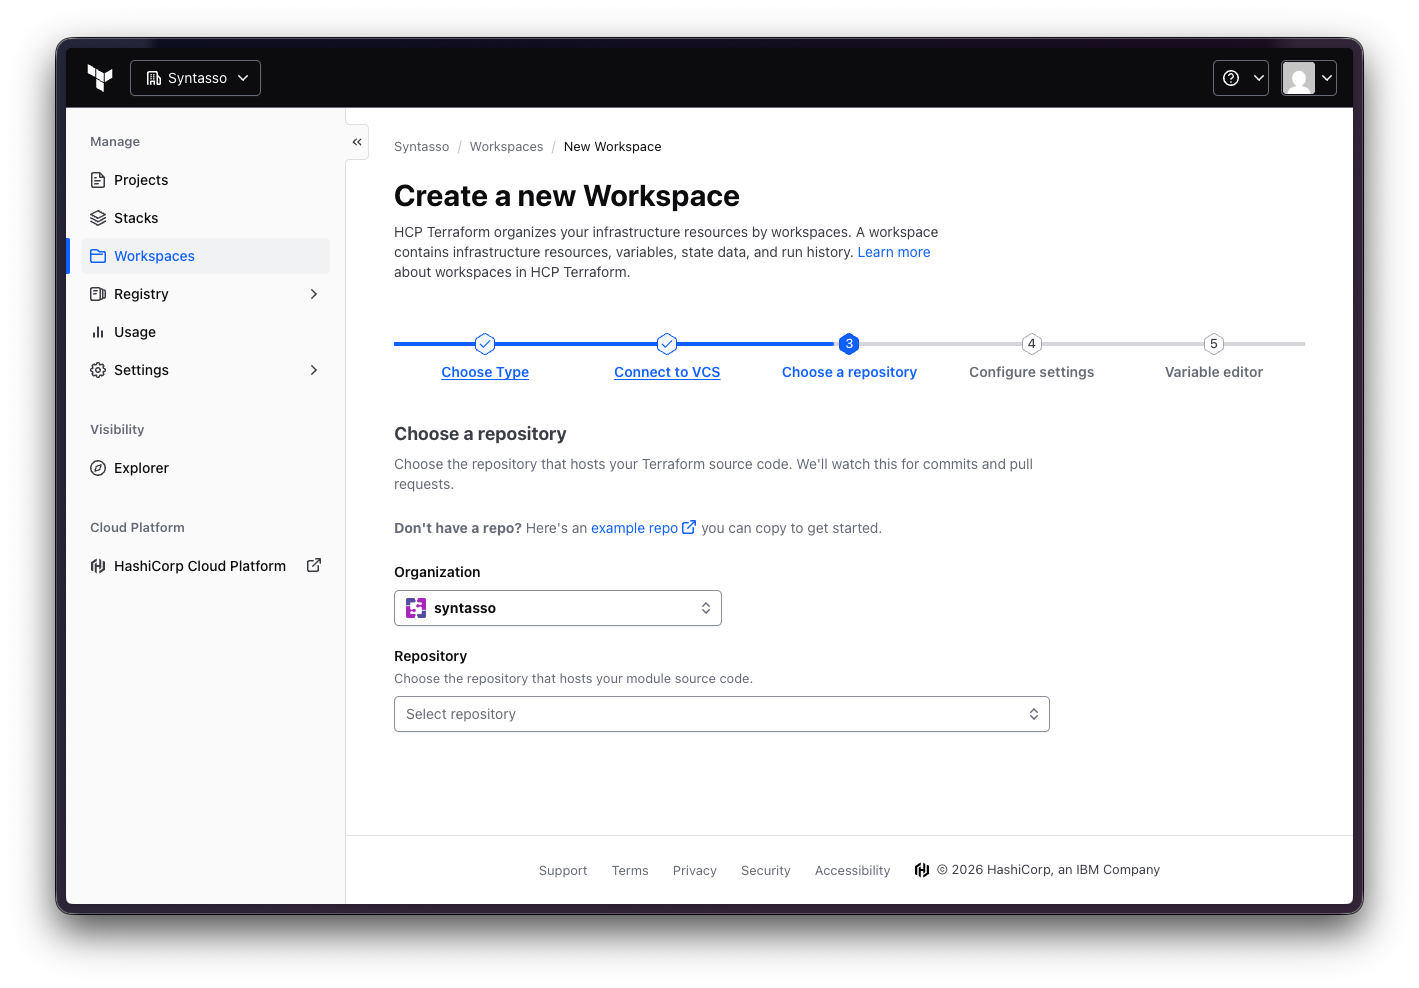
Since we want to watch the Git Repository, select the "Version Control Workflow" and follow the steps, selecting the right Organization and Repository. Note that this repository must be the same one that is referenced by the State Store in the Destination.
Make sure that, when configuring the settings, you click in "Advanced Options"
and select the subdirectory matching the Destination spec.path. For example,
for the Mobile team workspace, we defined the spec.path as mobile-workspace,
so we will select the mobile-workspace subdirectory. Also make sure to check
the Auto Apply boxes to have Terraform Enterprise apply the changes to the
workspace automatically.
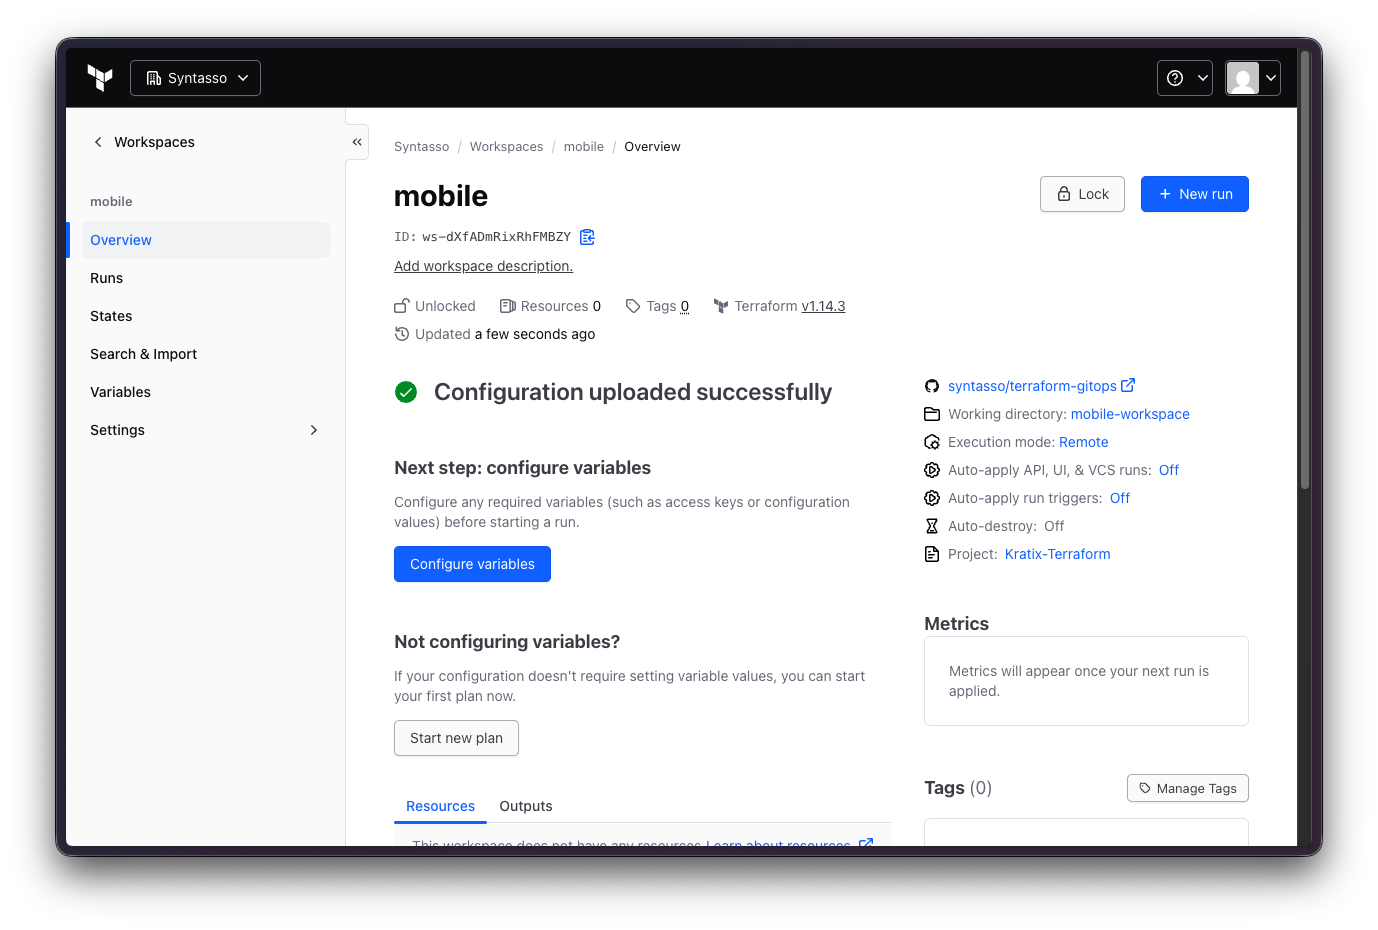
Once you finish configuring, you can click on Create and save your workspace. The Workspace Overview should look like this:
Repeat the same process for the Backend and Frontend workspaces. At this stage, your Platform should look like the diagram below:
Scheduling to destination dynamically
With the Platform and Terraform Enterprise configured, we can now start scheduling requests to the correct Terraform workspace.
We are using a pre-built Promise to focus on dynamic scheduling, but if you are curious about how this Promise works, you can build it yourself!
For that, we will use the S3 Bucket example Promise available here. You can install the Promise with the following command:
kubectl apply -f https://raw.githubusercontent.com/syntasso/kratix-examples/refs/heads/main/promise-terraform-aws-buckets/promise.yaml
You should see the following output:
NAME   STATUS      KIND   API VERSION                    VERSION
s3     Available   S3     example.syntasso.io/v1alpha1   v0.0.1
As part of the Promise API, you will find a property called spec.team. The value of this property will be used to determine the Terraform workspace to use for the request.
Inspect the Promise API:
$ kubectl explain s3.spec.team --api-version=example.syntasso.io/v1alpha1
GROUP:      example.syntasso.io
KIND:       S3
VERSION:    v1alpha1

FIELD: team <string>
ENUM:
    mobile
    backend
    frontend

DESCRIPTION:
    Team name identifier.
But how is this property used? Let's inspect the Request Configure workflow:
#!/usr/bin/env python3
import kratix_sdk as ks
import sys
from typing import List

def resource_configure() -> int:
    sdk = ks.KratixSDK()
    resource = sdk.read_resource_input()

    team = resource.get_value("spec.team")
    if not team or not isinstance(team, str):
        print("Error: spec.team is required and must be a non-empty string", file=sys.stderr)
        return 1

    selectors: List[ks.DestinationSelector] = [
        ks.DestinationSelector(match_labels={
            "workspace": team
        })
    ]

    sdk.write_destination_selectors(selectors)
    print(f"Destination configured for team: {team}")
    return 0

def main():
    exit_code = resource_configure()
    sys.exit(exit_code)

if __name__ == '__main__':
    main()
Note how the Promise is using the spec.team property to determine which
Destination the output of the Pipeline should be scheduled to, by writting a
destination-selectors.yaml file in the /kratix/metadata directory. The
Promise above is using the Python SDK to produce a file that looks like this:
- matchLabels:
    workspace: ${team}
So when the team is mobile, the destination-selectors.yaml file will look like this:
- matchLabels:
    workspace: mobile
When SKE is processing the request, it will look for destinations matching the
matchLabels defined in the file, ensuring that the resources are scheduled to
the correct Terraform workspace.
Which brings us back to the diagram at the beginning of this guide, where you can see how SKE will schedule the request to the correct Terraform workspace:
You can read more about Dynamic Scheduling in the Managing Multiple Destinations reference documentation.
🎉 Congratulations
Now you know how you can leverage Destination selectors in Kratix to dynamically route resources to their intended Terraform workspaces!
