Speeding up local dev: fast feedback when building pipelines


Are you building Pipelines and unsure about the best way to test and iterate over them? Worry not. Your questions are about to be answered!
In this blog post, you will gain insights into how you can get faster feedback on your Pipeline development by:
- Running the pipeline stage locally
- Running automated tests
- Testing imperative actions
- Running the stage as a container
We will also look into how to more effectively run system-level tests by
- Populating the image cache
- Setting the image pull policy
- Automating end-to-end (e2e) tests
Click "read more" below to continue!
Testing your Pipeline stages
As you may know, a Promise includes a set of workflows that are executed as part of a request for that Promise. The workflow itself is a series of Pipelines, and each Pipeline contains multiple Stages. These stages are usually encapsulated in a Container image.
At the start of a Pipeline Stage, Kratix will provide, in the /kratix/input directory, a YAML file (object.yaml) representing the user's resource request. This file is the same object that the user has applied to the Platform cluster.
We will only cover building and testing a Resource Request Pipeline stage in this post. A Promise Pipeline Stage has slightly different inputs, but the process to build and test is the same. Check the Workflow Reference docs for more details.
Kratix expects the Stage to produce outputs, and those outputs are stored in either /kratix/output or /kratix/metadata (depending on the purpose; not clear? Read the Workflows reference docs).
One of the main benefits of Kratix is the ability to test these Stages. In this blog post, let's assume we are building the following Pipeline stage:
- It takes as input an object containing
spec.contents. - It produces a ConfigMap with the
spec.contents.
In Python, this stage may look like this:
#!/usr/bin/env python3
import yaml, sys

with open("/kratix/input/object.yaml") as f:
    obj = yaml.safe_load(f)

name = obj.get("metadata", {}).get("name", "example-config")
contents = obj.get("spec", {}).get("contents", {})

configmap = {
    "apiVersion": "v1",
    "kind": "ConfigMap",
    "metadata": {"name": name, "namespace": "default"},
    "data": contents
}

with open("/kratix/output/configmap.yaml", "w") as out:
    yaml.dump(configmap, out)
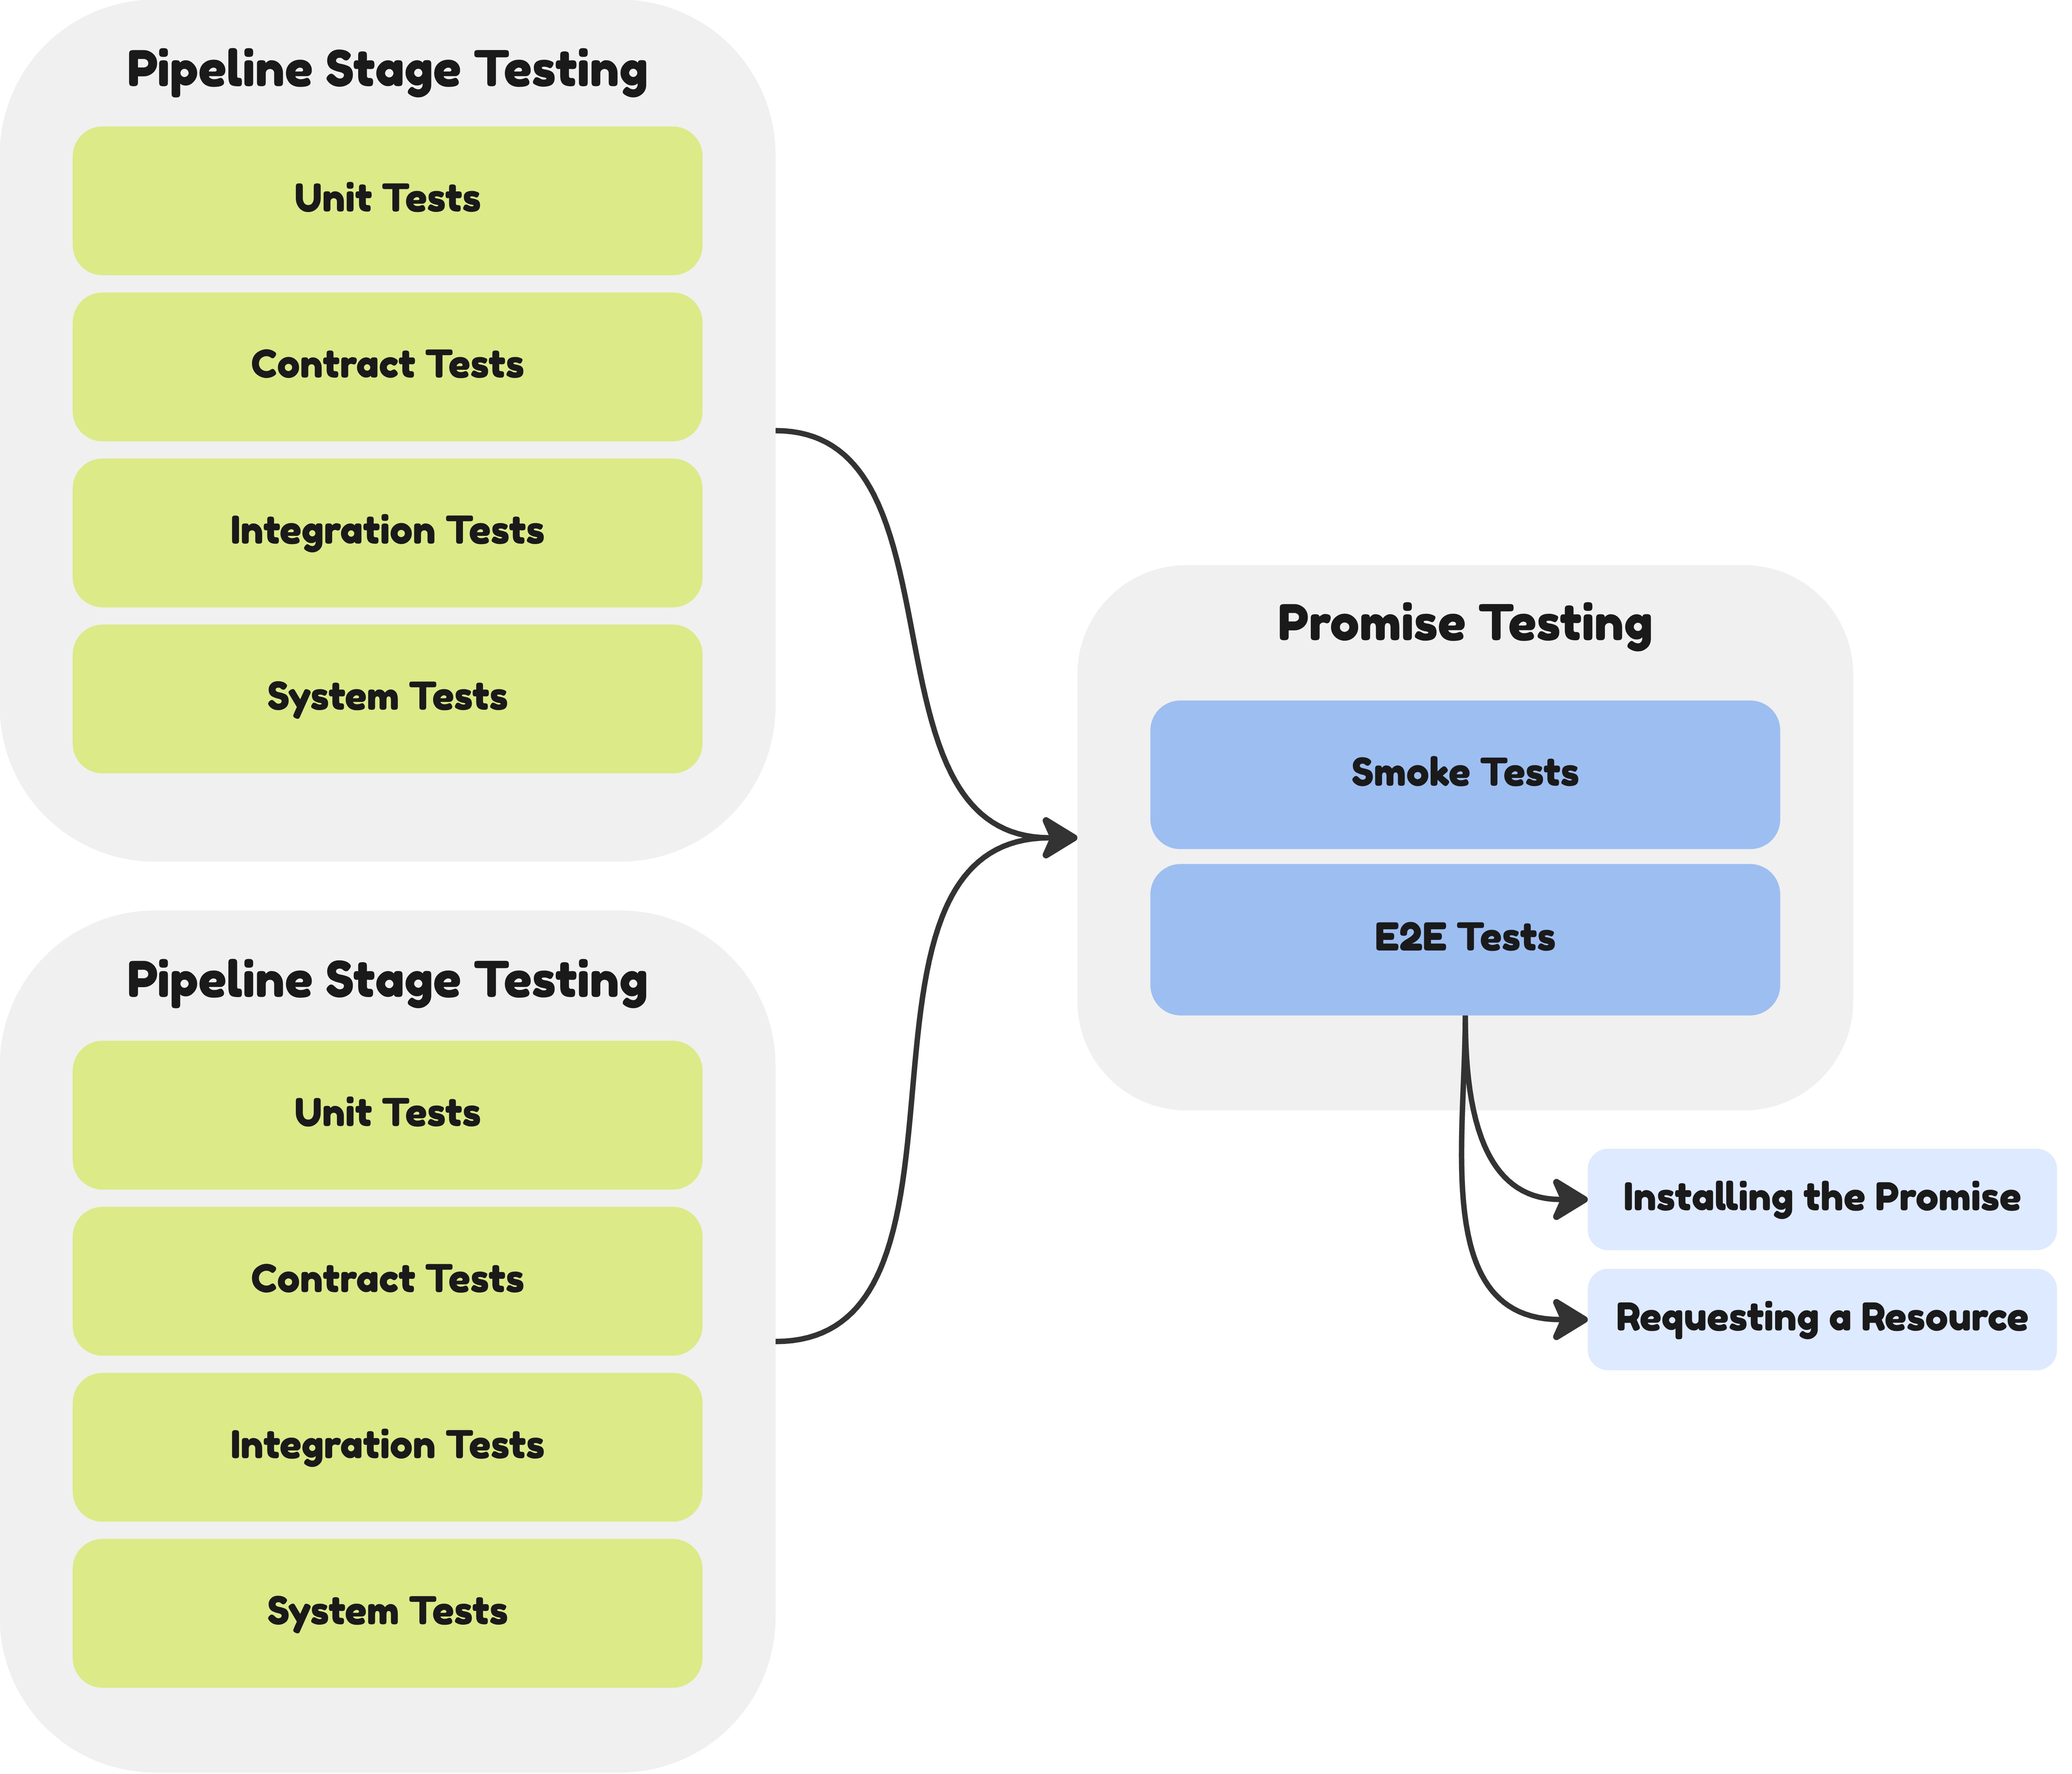
Pipeline Stages can be tested at different levels. In the next sections, we will explore ways you could implement and test at different levels, from unit to end-to-end tests. The diagram below illustrate some of the testing strategies you could use.
Running the pipeline stage locally
The simplest place to start is to make it runnable locally. That means you will be able to execute the script and quickly verify its output.
If we try to execute our Python script above, it will fail. It's relying on the Kratix Volumes, which (most likely) are not available on your machine.
A simple strategy is to parameterise the inputs and outputs. For example, you could update the script to read the volumes from environment variables, defaulting to the Kratix volumes:
#!/usr/bin/env python3
import yaml, sys, os

input_path = os.getenv("INPUT_PATH") or "/kratix/input/object.yaml"
output_path = os.getenv("OUTPUT_PATH") or "/kratix/output/configmap.yaml"

with open(input_path) as f:
    obj = yaml.safe_load(f)

name = obj.get("metadata", {}).get("name", "example-config")
contents = obj.get("spec", {}).get("contents", {})

configmap = {
    "apiVersion": "v1",
    "kind": "ConfigMap",
    "metadata": {"name": name, "namespace": "default"},
    "data": contents
}

with open(output_path, "w") as out:
    yaml.dump(configmap, out)
With this simple change, you can now run the script locally, passing the input and output as environment variables. First, create an example input file:
mkdir {input,output}
cat <<EOF > input/object.yaml
metadata:
  name: configtest
spec:
  contents:
    keyOne: one
    keyTwo: two
EOF
Next, save the Python script in a file (call it generate_configmap.py) and make it executable. Then, set the environment variables and execute the script:
You may need to install pyyaml to execute the script below.
pip3 install pyyaml
INPUT_PATH=input/object.yaml OUTPUT_PATH=output/configmap.yaml ./generate_configmap.py
This should produce an output-example.yaml locally that matches your expectations:
$ cat output-example.yaml
apiVersion: v1
data:
  keyOne: one
  keyTwo: two
kind: ConfigMap
metadata:
  name: configtest
  namespace: default
This is a start, but we can do better.
Running automated tests
Running locally is great, but it doesn't allow us to quickly verify if our script is working. If you look closely, you'll notice that a stage is not that different from a normal function in most programming languages: it transforms inputs into outputs.
Therefore, it should be quite simple to unit test these using whatever libraries your language of choice provides. Let's do that with our script.
First, let's refactor it to make it more testable by extracting the main logic into a function:
#!/usr/bin/env python3
import yaml, sys, os

def generate_configmap(input_path=None, output_path=None):
    input_path = input_path or os.getenv("INPUT_PATH") or "/kratix/input/object.yaml"
    output_path = output_path or os.getenv("OUTPUT_PATH") or "/kratix/output/configmap.yaml"

    with open(input_path) as f:
        obj = yaml.safe_load(f)

    name = obj.get("metadata", {}).get("name", "example-config")
    contents = obj.get("spec", {}).get("contents", {})

    configmap = {
        "apiVersion": "v1",
        "kind": "ConfigMap",
        "metadata": {"name": name, "namespace": "default"},
        "data": contents
    }

    with open(output_path, "w") as out:
        yaml.dump(configmap, out)

if __name__ == "__main__":
    generate_configmap()
Next, let's create a basic unit test file (called test_generate_configmap.py) for it:
#!/usr/bin/env python3
import unittest
import yaml
import tempfile
import os
from generate_configmap import generate_configmap

class TestGenerateConfigMap(unittest.TestCase):
    def test_configmap_generation(self):
        input_data = {
            "metadata": {"name": "test-config"},
            "spec": {"contents": {"foo": "bar", "baz": "qux"}}
        }

        with tempfile.NamedTemporaryFile(mode="w+", delete=False) as tmp_in:
            yaml.dump(input_data, tmp_in)
            tmp_in_path = tmp_in.name

        with tempfile.NamedTemporaryFile(mode="r", delete=False) as tmp_out:
            tmp_out_path = tmp_out.name

        try:
            generate_configmap(input_path=tmp_in_path, output_path=tmp_out_path)

            with open(tmp_out_path) as f:
                configmap = yaml.safe_load(f)

            self.assertEqual(configmap["kind"], "ConfigMap")
            self.assertEqual(configmap["metadata"]["name"], "test-config")
            self.assertEqual(configmap["data"], {"foo": "bar", "baz": "qux"})

        finally:
            os.remove(tmp_in_path)
            os.remove(tmp_out_path)

if __name__ == "__main__":
    unittest.main()
You should now be able to run the tests:
$ python3 test_generate_configmap.py
.
----------------------------------------------------------------------
Ran 1 test in 0.005s

OK
As you can see, this is a very simple use case and test. However, your pipeline stage may be complex, with several branches in the code. Adding a unit test suite like the above can help you move faster by ensuring you're not accidentally breaking existing features.
It's very common for Promise Writers to start with bash for their pipeline stages. While here at Syntasso we are #TeamBash, stages will often evolve into their own beasts, together with the scripts that back them. Consider the language you choose for your stages carefully, as some make it much harder to test than others 😉.
Testing imperative actions
A common use case is for the Stage to execute imperative actions, like calling APIs to validate or create external resources. At the unit level, you could easily add tests for those cases by using whatever features/libraries your language provides for mocking those external calls. For example, in Python, you could use the built-in unittest.mock.
The takeaway is that your stage is just software. You can use the same tools and methodologies that you use to build other pieces of software to build the stages. Over time, you will build a suite of unit, integration, and system tests around your stages to guarantee their functionality.
Running the Stage as a Container
Once you have your test suite running locally, you may want to execute a test in your container engine to guarantee it works in a containerised environment. In our example, we can run it in Docker by creating the following Dockerfile:
FROM python:3.10-slim

WORKDIR /app

# Copy the script into the container
COPY generate_configmap.py .

# Install PyYAML
RUN pip install --no-cache-dir pyyaml

# Run the script
CMD ["python", "generate_configmap.py"]
We can then build it:
docker build -t configmap-generator:dev .
To execute it, you will need to ensure the container has access to the expected Kratix Volumes. You can use the --volume flag to mount a local directory into the container at the specified path. To run the container, run:
docker run --rm \
  --volume $(pwd)/input:/kratix/input \
  --volume $(pwd)/output:/kratix/output \
  configmap-generator:dev
Executing the command above will mount your local input and output directories as the Kratix Volumes. You should see the generated output in the output directory. You can play around and change the inputs to verify it further.
Testing the Promise
Great! At this point, you are confident that your stage performs as expected, and you're ready to add it to your Promise. In this section, let's explore how to validate your stages in an actual Promise.
Populating the image cache
If you just add your stage to the Promise and install it, you will likely get an ErrImagePull error. That's because Kubernetes will try to download the image from the actual registry.
You could build and push your image to the registry, apply your Promise, test, and repeat; however, that can be quite error-prone and slow.
If you are running Kratix in a local Kubernetes cluster, deployed via KinD or Minikube, for example, a simpler approach is to load the container image directly into the Kubernetes node cache.
If using KinD, you can run:
kind load docker-image configmap-generator:dev --name platform
Note that we are tagging the image with a dev tag. We recommend you set a tag in your container image: when it's not set (or when it's latest), extra configuration is required for Kubernetes to use the correct cached image.
Setting image pull policy
By default, the Kratix Pipeline Pod containers will have the imagePullPolicy set to the defaults that Kubernetes defines. In development, you often want that to be either IfNotPresent or Never. That is, Kubernetes should only attempt to download from the registry when it's not already in the cache (or never).
Image Pull Policy is a Stage-level configuration: you set it per container in your Pipeline, and different stages may have a different pull policy. For example:
apiVersion: platform.kratix.io/v1alpha1
kind: Promise
metadata:
  name: postgresql
spec:
  api: # ...
  workflows:
    resources:
      configure:
        - apiVersion: platform.kratix.io/v1alpha1
          kind: Pipeline
          metadata:
            name: instance
          spec:
            containers:
              - name: stageOne
                image: configmap-generator:dev
                imagePullPolicy: Never
              - name: stageTwo
                image: another-stage:v1.0.0
                imagePullPolicy: Always
If you are making changes to your stage but are not actually seeing the results you expect, double-check you are using the image you actually want!
Automating e2e tests
You will also want to test the full end-to-end result of executing the Pipeline. While the steps above gave you confidence that each individual stage will work in isolation, you still need the full pipeline execution to validate whether they all, together, produce the expected result.
The simplest way to test this is to run something akin to a system test:
- Install the Promise:
- Verify the expected dependencies are installed in the Destination.
- Request a Resource from the Promise:
- Verify the expected resources are created in the Destination.
In fact, this is how we test all the Promises in our Marketplace. For example, the Redis Promise executes the following tests on CI:
#!/usr/bin/env bash
set -e

test_promise() {
  kubectl wait promise/redis --for=condition=ConfigureWorkflowCompleted --timeout=120s
  kubectl get crd redisfailovers.databases.spotahome.com
  kubectl wait --for=condition=Available --timeout=5s deployment/redisoperator
}

test_resource_request() {
  kubectl wait --for=condition=Available --timeout=5s deployment/rfs-example
}

if [ "$1" = "promise" ]; then
  test_promise
else
  test_resource_request
fi
On Promise installation, it expects a few resources to appear on the Destination, including the Redis Operator deployment. On Resource Request, it expects a new deployment for the Redis instance to appear on the Destination.
The test script above assumes that the Destination kube context is the one currently targeted.
You can use a similar approach to validate that all of the stages work as expected. This is especially important when stages can modify the outputs from a previous stage (like the /kratix/metadata/status.yaml file).
Conclusion
Building and testing Pipelines in Kratix doesn't have to be a trial-and-error process. By treating your stages as standard software components—backed by tests—you gain faster feedback, greater confidence, and smoother iteration.
The more you invest in testability, the faster you can move from idea to production-ready Promise. Whether you're crafting a simple configuration generator or orchestrating complex external systems, the techniques covered here help you ship robust, dependable Pipelines.
We hope this post gives you a good base on how to develop your pipelines. As always, feel free to drop by our Slack or GitHub to continue the conversation.
Happy shipping! 🚀
